Watercolor Academy Online Course
A self-study, self-paced course where you can learn how to paint in watercolor by watching video lessons and doing assignments
$297 USD
ENROLL NOWA self-study, self-paced course where you can learn how to paint in watercolor by watching video lessons and doing assignments
$297 USD
ENROLL NOWOne-to-one, unlimited and custom-tailored to your skills and needs Personal Tutoring by the Watercolor Academy teachers
$997 USD
ENROLL NOW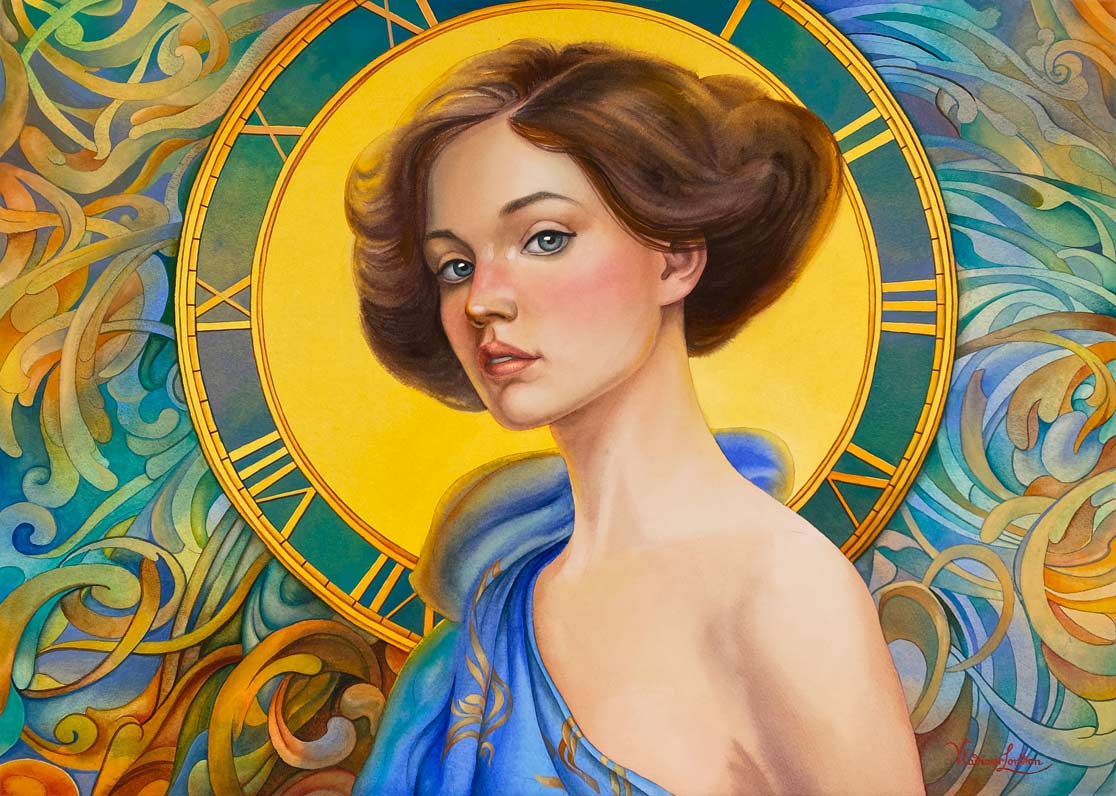
In this video, I will make this watercolor artwork, testing my new brushes from Escoda. I have known this brush manufacturer for quite a long time and even visited their factory near Barcelona in Spain several years ago. I was very impressed by the quality of their products and attention to every detail of every brush. You may learn about their artist quality brushes for oil, acrylic, watercolor and other media on the website Escoda.com
Here, you can see some leaflets with the brushes for watercolor. Escoda developed a new type of mop brushes from the Ultimo range, called Evolution. It has a very striking design. They did it in collaboration with a painter and designer, Joan Coch. Here's a leaflet dedicated to this type of brush; it explains the unique characteristics of the Evolution brush. So, let's see the real product.
Ultimo Evolution brushes are individually packed in nice boxes and available in three sizes: number 12, 16 and 20. The premium quality of the box immediately tells that it contains a very special product. The brush name is embossed in silver. The brush itself is securely stored inside. Also, you can see the perforated design of the box, which mirrors the main feature of this brush, a series of small holes in the ferrule. The wooden handle is short, light and smooth. Its one side is flat, so the brush won't roll across the working table surface. The number 12 brush has a 9.5 mm diameter. Let's check the number 16 brush. It has all the same features, but its diameter is just over 13 mm. And finally, the biggest brush from this range is number 20. Its diameter is a bit bigger than 15 mm. It sits nicely in the hand and its handle also has a flat side. Like with all Escoda brushes, the ferrule is clamped around the handle not with two, but three grooves, which makes it stronger. I will test these brushes in a short while.
Now, it's time to prepare the artwork design. The 300 gsm, 100% cotton, Arches Rough sheet of watercolor paper is stretched on the wooden board. The design is outlined on the tracing paper in two colors, blue and red. It is quite a complicated composition, which I would rather transfer than draw freehand on the watercolor sheet. This will avoid erasing and redrawing and keep the paper surface white and unspoiled. The tracing sheet is attached to the board at one side with a couple of pieces of masking tape. Such attachment will allow you to lift this sheet from time to time to check the transfer process. To transfer this design, I simply repeat every line with a pen. It will take some time because accuracy is required here. To see how blue lines look on the paper sheet, I simply lift the tracing paper. The pen pressure leaves nice marks on the surface; so, I will continue with the rest. When the entire drawing is outlined, I can once again check the quality and remove the tracing sheet.
The next step is to choose colors. For the background behind the head, I will need a couple of yellow colors. To eliminate guessing, I prefer using DIY color swatches of the paints I have. Here are the colors I will go for. The shape of the background on both sides of the head tells that it would be better to rotate the board while painting rather than paint on both sides simultaneously. So, I will rotate the board to start from one corner.
Here's the number 16 mop brush. Because the area to be covered with paint is not too big, this brush size would do. I premixed the sufficient quantity of paint to make an alla prima wash in one go. From the very first brushstroke, I can tell that I like this brush. Its pointing end gives great precision, while the belly holds a lot of paint. Also, this brush releases paint nicely; it does not run from the brush uncontrollably, but flows as required. The brush gives as much paint as needed, and it is easy to control with pressure on the brush. The hair is very soft and absorbent. Even though it is not a natural squirrel hair, it feels like a natural product. It has very similar stiffness and absorbency. Even after only a few brushstrokes, I can tell that this is a really good mop brush. It holds plenty of paint and at the same time, I can make very thin brushstrokes if needed. With increased pressure, this brush would produce very wide strokes, yet the amount of paint would be uniformed across thin and wide brushstrokes. This is great! The small round holes in the ferrule allow the Evolution brush to load 50% more paint compared to the next best mop brush from the same range. By the way, this innovative design with ferrule holes is patented and not available from any other manufacturer. This is a truly unique brush. It is designed to make big washes without losing the point.
Talking of washes, I am now making the Plain Wash. It is called that way because it has no gradations or variations of color and tone. It is the simplest wash in watercolor. The technique I'm using is called the "Saw wash" because I make multiple short brushstrokes at some angle, so the painted edge looks like the teeth of a saw. The reason I'm applying brushstrokes at an angle is because this way, paint flows down and intermixes within every stroke, which makes this wash even smoother. The board is tilted at about 15 degrees. This tilt is just enough for paint to flow slowly and collect in a bead at the lower edge. This edge has to be moist at all times while making a wash because should it dry, the wash will be interrupted and a visible dry border will spoil the painted surface.
When I cover some area, I turn the board slightly for the paint to flow downward and continue the plain wash. One of the rules of such a wash is that the previously painted area should be left to dry without retouching or coming back to already painted spots. This wash has to be completed in one attempt, which is called alla prima. Once again I rotate the board for paint to flow down. Another important rule for the plain wash is to pre-mix sufficient quantities of paint before making that wash. If you run out of liquid paint in the middle of the process, you would have to remix it again. This might be quite challenging, because you may not get exactly the same color, but even more importantly, paint could dry on the surface while you are mixing. This might result in a harsh border between two mixes. It is better to mix more paint than you need, than run out in the middle. Working with the Evolution brush is quite a pleasant experience. The number 16 is just right for this job. I actually do not see the big difference between natural hair and these synthetic hair brushes. This brush holds its point nicely. I can paint a very precise line at the wash edge and apply broad brushstrokes in the middle.
My aim for this wash is to keep it alla prima, which means it will be only one layer for this yellow circle. That is why I had to get the right color and tone from the first take. There will be no changes to this area thereafter.
The yellow background is complete and dry by now. I have premixed 7 different colors for making a variegated wash. Such a wash will go around the yellow circle. The name "variegated wash" means that the area will be covered not with one, but multiple different colors. That is why I prepared such colors beforehand. As you can see, the choice of colors varies from warm yellow and orange to cold blue and turquoise. The variegated wash is quite similar to the plain wash, with the only difference that I am using not one, but several colors. Such pre-mixed paints are applied next to each other and every new patch of color overlaps the previous one. This overlapping allows paint to flow from one color to another and intermix. The main challenge here is to mix such colors softly without visible harsh borders.
Once again, I am applying paint with short diagonal brushstrokes. Every next stroke slightly overlaps the previous one. This allows paint to flow from one stroke to another. There are many factors that influence a variegated wash appearance. Such wash will depend what kind of pigments you use, how quickly you apply brushstrokes, what is the tilt of the board, humidity in the studio, amount of moisture on the brush and paper, and what kind of paper you are using.
Good quality paper is probably the most important art material in watercolor painting. The quality of brushes comes second. And quality of paint is even less important. So having the right type of watercolor paper is crucial. For all my watercolor artworks I am only using high quality 300 gsm 100% cotton paper. It is rather expensive, but it is worth it.
Coming back to the background wash, you can see that I am applying colors almost randomly. I place cold and warm hues next to each other without paying much attention to the drawing design. This is because I plan to do this background in multiple layers. The first layer will make the paper off-white and give an approximate hue gamut to the background. For this job I am using Evolution mop brush number 12. It is a bit smaller than number 16 used previously, but as you can appreciate, the color patches are smaller as well. I do not need as much paint on the brush as before. Instead, I load a smaller amount of every color. From time to time I rinse the brush in water to clean it up, so the next load of paint would not be spoiled by the previous one. Like with the plain wash, it is important to continue painting without touching already covered areas. This way, you will avoid back-runs and unnecessary borders between colors. I will continue the variegated wash on the right-hand side of this artwork. The first layer of this background is almost complete. I will let it dry before continuing. When the variegated wash is fully dry, I can paint wet-on-dry, overpainting this abstract background, depicting the organic design by using slightly different colors. The combination of the free-flowing borderless wash with sharply outlined leaves and stripes will give me the necessary impression I want to achieve. Because watercolor is a transparent medium, the underpainting colors will show through the top layer. The optical mixing of colors will give a bit different hues that won't be obtainable should I mix the same paints directly on the palette or on the paper surface. You can appreciate that the choice of colors for the first wash influences the overall hue of this artwork, but at the same time, the randomly applied colors in the underpainting do not change the design. This is a rather interesting way to achieve the desired results with an economical approach of painting in only two layers.
With the abstract organic background complete, I will now paint the clock decoration. Its surface is washed in yellow and this layer will serve as the underpainting. Although watercolor is a transparent medium, some paints are more opaque than others. Transparency depends on pigments used for certain paints. For example, Cobalt blue and Turquoise Blue are opaque paints and will overpaint yellow underpainting nicely. The yellow color will only slightly show though, giving a bit of a greenish appearance, this is the effect I want to achieve. I have to do such overpainting in blue in one color because cobalt is coarse pigment and would look dull should I apply some glazings on top. This is another important rule to know when it comes to painting in layers. It is better to use pigments from the first to last layer in the order of their pigment particles size. Dies and very fine particle pigments are good for glazing, but they should not go on top of more coarse and heavy particle pigments. That is why it is important to know the characteristics of watercolor paints you use. I am painting wet on dry, carefully smoothing the borders between brushstrokes because this part has to be done in one attempt. Also, you may see that I slightly vary the amount of paint to gradate its opacity from darker and more opaque at the top to slightly more yellowish color down below. I'm also painting around the Roman figures, preserving original yellow underpainting that way.
I have finished the background and will now paint the face. It will be done in several glazing layers, starting from the plain wash and then with gradated and variegated washes on top. Every layer will be applied only when the previous one is fully dry. Such a multilayer painting approach will give a greater control over the painting process and allow smoother gradations and stroke-less texture. When making the wash, I have to paint around the highlights to keep these areas white. Wiping off or washing out would not give the same whiteness of paper as preserving it in the first place. When mixing colors for flesh tints, it is better to use just a few paints, two or three at the most. This is because every paint comes with some undertones and impurities, which combined together might produce duller hues or chromatic grays. Another rule for painting in layers is to use only transparent and semi-transparent paints. This is especially important if you want to get nice optical mixing results. Some opaque or semi-opaque pigment overpainted with glazes would look muddy, which you want to avoid in portrait painting. That is why students in the Watercolor Academy Correspondence Course learn their paint properties and are taught how to use their paints in the best way. Transparent glazes can be applied wet-on-dry and wet-on-wet. Both methods will be used for this portrait painting. Later, I will also use retouching for painting the mouth and dry-brush-on-moist for painting the hairstyle as well as other methods and techniques to make this portrait composition.
I am now using the retouching painting method, applying very short and slim brushstrokes to achieve special texture. This is the method employed by some famous illustrators and you will learn it in the Watercolor Academy course. One of the common mistakes beginner painters make is leaving eyeballs too white. An eye is a sphere and as such will always have light and shade as well as the casted shadow under the eyelids and eyelashes. Another common mistake is depicting individual eyelashes in multiple brushstrokes. This might be good for children's book illustrations, but in fine art, the old masters came up with another approach - painting one bold stroke to unite eyelashes into one mass. Another know-how of painting eyes is making sure that the iris of each eye is the same in size and shape. I see this artwork as an illustration, not as a piece of fine art and therefore will exaggerate the facial features, which otherwise can be less contrasting and so finely defined.
To paint the hairstyle, I will use the dry-brush-on-moist watercolor painting method. For this method, I first wet the paper surface with clean water, but do not oversaturate it with water. The surface has to be moist, which means that water has to penetrate into the paper fibers, but do not remain reflective on the surface. The paper will be cold on touch because water evaporates, but otherwise, you won't see it by eye. The term "dry-brush" in this case does not literally mean dry; it means that paint would not drip from the brush even if you squeeze its belly between fingers. This way, the paper would absorb paint from the brush without it freely flowing on the surface. Another method I will use for painting this hairstyle is dry-brush-on-dry. This time, I do not wet the paper, but use the same amount of paint on the brush to make strokes that look dry. The brush only leaves marks on top of the paper tooth, while valleys of the paper surface remain white. Later, I will overpaint this brushwork to achieve a bit different texture, but I hope you see the difference in approaches.
For the drapery, I will use wet-on-wet and wet-into-wet methods. Although they sound similar, they mean different things. The wet-on wet means that I first wet the paper surface with clean water and then apply a glazing layer of paint. Wet-into-wet means that more paint is added into an already painted area, which still remains wet. In such a case, the amount of moisture on the brush should be reduced for wet paint not to spread out uncontrollably and do not produce backruns or cauliflower effects. The drapery will be completed with design in opaque Naples yellow paint.
While I am painting, I will tell you a few words about the Watercolor Academy. It has two courses, online and correspondence. In the online course, there are 80 video lessons on different watercolor painting and color theory topics. These topics will give you everything you need to know to become a professional watercolor artist. The video lessons start from the basic foundation, which includes the needed information on watercolor materials and equipment. You will find out what kind of paper, brushes and paints you need to make good quality artworks. You will also learn color theory, including how to mix primary, secondary and tertiary colors, and how to obtain any color you want from a very limited range of paints. You will also learn what the color circle is and how to make and use one. In addition, you will discover 7 different color contrasts, such as contrast of hue, light-dark contrast, cold-warm contrast, complementary contrast, contrast of saturation, simultaneous contrast, and contrast of extension. Apart from the color theory, you will also learn 15 elements of composition and how to use them for making creative and well-balanced artworks that tell a story and evoke emotions. You will also discover the golden ratio and golden proportions and learn how to apply such proportions in your works of art. You will also learn such practical tasks like how to transfer drawings and how to use 5 main methods and 9 different techniques of professional watercolor painting. A big part of this online course is dedicated to professional painting methods and techniques. There are 5 methods explained in this course, including the plain wash, gradated wash, variegated wash, which I am making right now, granulated wash, as well as wiping off and washing out. Also, there are 9 painting techniques explained and shown in depth in the video lessons. They include wet-on-dry glazing, wet-on-wet glazing, wet-on-dry alla prima, wet-into-wet alla prima, drybrush-on-moist alla prima, drybrush-on-dry, retouching, pen-and-wash, as well as wash-and-outline. When you master all these techniques, there will be no secrets for you in watercolor.
You will also get videos on how to work with colors. You will learn how to paint in grisaille, which is in one color, and why tonal values in watercolor are more important than hues. You will also discover how to make colorful artworks using a very limited palette of colors. Did you know that it is totally possible to make a full-color artwork using only two paints? For example, one warm and one cold hue. You will also discover how to make full-color artwork using only three paints. The color theory says that it is possible to obtain any color mixing only three primary hues – red, yellow and blue. And you will see this theory in practice.
In addition to color theory and working with colors, you will also watch multiple video lessons on different genres, including geometric pattern design and organic pattern design, botanical painting, painting sky and water using different painting techniques including wet-on-dry variegated wash, dry-brush-on-moist, wet-into-wet, gradated wash glazing, wiping off and washing out. You will also learn how to make architectural artworks using the wash-and-outline and pen-and-wash methods, how to paint seascapes, animals, and birds, how to paint sunlight, and cityscapes, how to paint still life, human figures, and portraits. You will also see the full process of making creative compositions.
The Watercolor Academy online course comes not only with video lessons, but also with unlimited personal support. Such support includes your artwork's critique and answers to your art-related questions. This support is provided for a lifetime at no extra charge. No art college would ever offer you the same service.
If you are serious about becoming a professional watercolor painter, the best option for you is to take the Watercolor Academy correspondence course. This course is truly unique. Here is how it works. When you enroll, you will get a Welcome email that will explain what watercolor materials you need, and also provide instructions for making several test artworks. These artworks are required for the tutors to assess your current level of art skills. An in-depth critique of your artworks will come together with suggestions on what you need to learn to improve your drawing and painting abilities and your watercolor curriculum, which will be tailored for your skills and needs. If you want to concentrate on some specific technique or genre, for example making alla-prima watercolor portraits or seascapes, such topics will be included into your curriculum. Because in this course you will get personal tutoring, it could be shaped into whatever curriculum that you will benefit the most. That is why this course is perfectly suitable for complete beginners as well as advanced artists. If you have never painted in watercolor before, you will learn all the basic things you need to know to get strong painting skills. If you already have some experience in watercolor, the academy tutors will check what skills and knowledge you are missing and provide topics that will fill the gaps in your art education. In any case, this course is designed to bring you from your current level to advanced abilities in watercolor painting.
All the topics you need to learn will be explained in 100 specially designed practical tasks. Every task will come with necessary instructions and examples. You will know what to do in every task and what to report. Every artwork you make in this course will be assessed by the academy tutors and they will advise what mistakes you make and how to fix those mistakes. Every next task will be given to you when you complete the previous one with the necessary quality. That is why there is no way to fail. You will go step by step from simple tasks to more advanced and your every step will be supported by the tutors. If you need some specific info, demo or video explanation, such materials will be provided for you so you would know what to do at every step. Watercolor painting is a part of culture and culture is passed from person to person. That is why it is so important to have talented and professional art teachers who will help you to reach the advanced level of watercolor painting skills that would not be attainable otherwise on your own.
Here's the list of topics that you will get in the Watercolor Academy Correspondence Course. To begin with, you will find out how to choose the right materials for watercolor painting and explore the specifications of the materials you already have. You will be given a special task on an art materials topic and make your own investigation, learning about your watercolor paints and making special swatches that will help you to make an educated decision of purchasing and using watercolor materials. You will practice five methods and nine techniques of professional watercolor painting. You will begin with the plain wash that can be done in several ways and learn which factors influence such washes. Although very basic, this skill will elevate your watercolor abilities above the majority of art college graduates, and this is only the beginning. To continue your journey through professional painting methods, you will also learn and practice the gradated wash. This is the wash where tonal values change from light to dark or from dark to light in a fully controlled manner. Mastering this method will allow you to make artwork with gradated backgrounds, for example painting skies and stretches of water, like seascapes, for example. Another important method you will get fully familiar with is the variegated wash. Many artworks can include several types of washes, like for example, this one. Mastering all the methods will give you the skills every professional watercolor painter must have. What differentiates a professional watercolor artist from an amateur is the ability to preserve white paper and light areas without masking with tape or fluid. There are special techniques of preserving white in watercolor, including wet-on-dry and wet-on-wet techniques. Another advanced way of preserving white is by painting dry-brush-on-moist. This painting method allows great possibilities in watercolor painting and those artists who master it will have a great advantage in expressing their creative ideas in watercolor. There are also several watercolor painting methods that you need to know and be able to use with ease to be good at painting. They include painting in layers, both wet-on-dry and wet-on-wet. Such approaches will influence your watercolor style in the best way because you will be equally skilled to paint on dry as well as on wet supports. The combination of both will open new possibilities in telling your stories in the watercolor medium. After learning the multi-layer painting approach, you will advance to alla prima techniques. You will learn how to paint in watercolor in one attempt both wet-on-dry and wet-into-wet. In addition, you will also learn one of the most advanced methods of painting alla prima dry-brush-on-moist. This method might take you some time to master, but when you know how to use it, you will be able to make works of art not attainable by any other method or technique because this method stretches from dry-touch to free-flowing passages of paint that make the gamut so attractive and beautiful. To complete the painting technique foundation, you will also learn how to use retouching, pen-and-wash and wash-and-outline methods. The best illustrators in the World use retouching to make compelling artworks that can only be achieved by retouching. This method is rather time consuming, but the results are stunning. You will learn how to achieve such results in this course. You may not realize, but many watercolor painters use only one or two painting methods and lack the full range of painting possibilities. In the Watercolor Academy Correspondence Course, you will learn not one or two ways of painting, but 14 main approaches to laying down washes, and applying watercolor paints on paper. Such a wide range of painting techniques is not taught anywhere else. This alone makes the Watercolor Academy Correspondence Course so special. And this is only the foundation. There is so much more you will learn in this course.
When you know how to apply paint on paper, you will learn the color theory in depth making practical exercises of mixing primary colors to obtain secondary and tertiary hues, making swatches and color wheels. You will learn about complementary colors and how to achieve chromatic greys the best way. You will also find out all you need to know about the harmony of colors and color contrasts. There will be special tasks on light-dark and cold-warm contrasts, contrast of saturation and contrast of hue by making geometric pattern designs and special swatches and diagrams.. In addition, you will continue exploring your range of paints, finding the best pairs of colors and making swatches that you could use in the future for creating your works of art. After covering the color theory in depth, you will be able to use this knowledge for making better watercolor pieces with the full understanding how colors can help in telling your story and evoke viewers' emotions.
Did you know that tonal values in watercolor are more important than colors? In special tasks, you will cover this topic in depth because good tonal painting skills are needed for making professional and beautiful works of art. The tasks on this topic will include painting different genre artworks, such as architecture, still-life and landscape in monochrome. The ability to depict anything you see or imagine in only one color is a great skill to have because watercolor is a challenging medium and you need to know how to manage it not only with using various hues, but also the full range of values. Because monochrome painting is so important for growing your watercolor painting skills, this approach will be repeated several times throughout your Watercolor Academy curriculum.
Of course, the word "watercolor" contains the term "color". That is why you will learn the best approaches to painting in color. To begin with, you will discover how to make an artwork that looks very colorful by using only two hues. Some professional watercolor masters use this approach as their "signature feature". They use only two paints for making the most of their masterpieces, and adding some other hues only as accents. This instantly creates a special style that is unique and recognisable. This is what makes their works of art stand out. Whether you like this idea and want to adopt it, or simply try and see what you could achieve; you will be given special tasks on making watercolor in only two colors. This will help you deeper understand the theory of colors and how to achieve great results without purchasing every paint you see on the market.
The color theory says that every color can be obtained by mixing only three primary colors - red, blue and yellow. In practice, this will depend on how pure your primary color paints are, but nevertheless, you will learn the very special way of making full-color artworks by using only three paints. This way you will learn that even a very limited palette of only three colors can give great results when used the right way. In addition, you will also get special tasks on painting in five colors that will cover most of your needs in hues.
Such exercises will prepare you for any genre painting you want to learn and practice. The painting methods and techniques will give you the needed skills of applying paint on paper and preserving white and light areas, while the color theory tasks will give you the needed knowledge and good taste when it comes to using different colors. This foundation is required for any painter who would like to become a professional artist. With the skills you will receive by now in this course you will be able to advance to any genre of your choice. Your curriculum will cover multiple genres such as architectural painting, still-life painting, landscape, seascape and cityscape painting, botanical painting including flowers, trees, etc., drapery painting, painting patterns and creating organic and geometric designs, animalistic painting, and so on.
And of course, this personal tutoring course would not be complete without figurative painting. In your curriculum, you will receive tasks on making portrait and figure artworks as well as tasks on figurative compositions. You will learn how to paint portraits in watercolor step-by-step, using different methods and techniques. Portrait painting will begin with monochrome artworks, portraits with underpainting, and then advance to full color watercolors. With nine different techniques this gives you 27 different ways of professional watercolor portrait painting. Such an extensive range of portrait painting approaches is not taught anywhere else. I hope you understand now why this course will elevate your watercolor skills to the advanced level.
Apart from painting portraits, you will also learn how to paint hands using the same 27 different approaches. This topic will be no mystery for you as soon as you cover the dedicated tasks. Your portrait artworks will attract viewers and commissions when you know what to do and how.
In addition to portrait and hand painting, you will also learn how to paint standing, sitting and reclining figures in different poses and from different points of view. This is when your previously gained skills of drapery painting will help you to depict people dressed in any style you like. You will also learn how to paint figures in motion and how to create engaging compositions that tell your story and evoke emotions.
I think you already have a good understanding of what this corresponding course curriculum is about, but this is only the basic structure that can be amended in the way that interests you the most. For example, if you want to learn how to paint some specific genre, let's say marine life, birds, character design, manga, anime, or children illustration, such topics can be included into your curriculum. But the best thing is - this course comes with unlimited personal support at no extra cost, so you can rely on our help for a lifetime for a one-time fee. No art college would ever offer you the same service. This is what makes the Watercolor Academy Correspondence Course truly unique and special. Today, this is probably the best watercolor course in the World!
A self-study, self-paced course where you can learn how to paint in watercolor by watching video lessons and doing assignments
One-time payment - Lifetime membership
$297 USD
One-to-one, unlimited and custom-tailored to your skills and needs Personal Tutoring by the Watercolor Academy teachers
One-time payment - Lifetime membership
$997 USD


