How to Paint Landscapes in Watercolor
By Vladimir London, Watercolor Academy tutor
When it comes to painting landscapes in watercolor, many artists stick to one or two painting techniques, which rather limits their creative possibilities. To help you to expand your skills in this area, I will present several methods and techniques that are taught in the Watercolor Academy course. Those students who take Watercolor Academy personal tutoring will get special lessons on this topic.
1 .Wet-into-Wet Alla Prima
This artwork is done in one session while the paper surface is still wet. More paint is added several times into one place to achieve dark values as pigment sinks into the paper surface and becomes lighter. To achieve such a result, there should be the right balance between:
- wetness of paper
- brush wetness
- and amount of paint on the brush
As more paint-mix is added, the paper surface becomes wetter and therefore the brush should be kept drier, but loaded with more pigment.
You can see here that tonal values are more important than colors. Red is a questionable color for a field of grass, but it gives a nice contrast of hue.
Details are very much secondary; there is no description of trees and bushes, but an impression of vegetation. Outlines freely flow and diffuse.
2. Variegated Wash
This landscape is done in two layers.
First, the sky and water are painted in one go using the variegated wash. Various colors with different tonal values softly fuse into each other on the moist paper surface.
The trees on the background are painted when paper dries a bit, using the dry-brush-on-moist painting method.
The reflection under the trees is painted as the second layer. For this purpose, the dry paper surface in this area is moistened with clean weather and paint is added as a wet-on-wet glazing.
Tonal values of water are darker than the sky because water reflects sky and absorbs some light. For the same reason, hues of water are less saturated than the sky.
The choice of colors is secondary to the tonal values. Dramatic effect is achieved by dark clouds. The background trees are blue due to the aerial perspective. Their reflection is muted to brown.
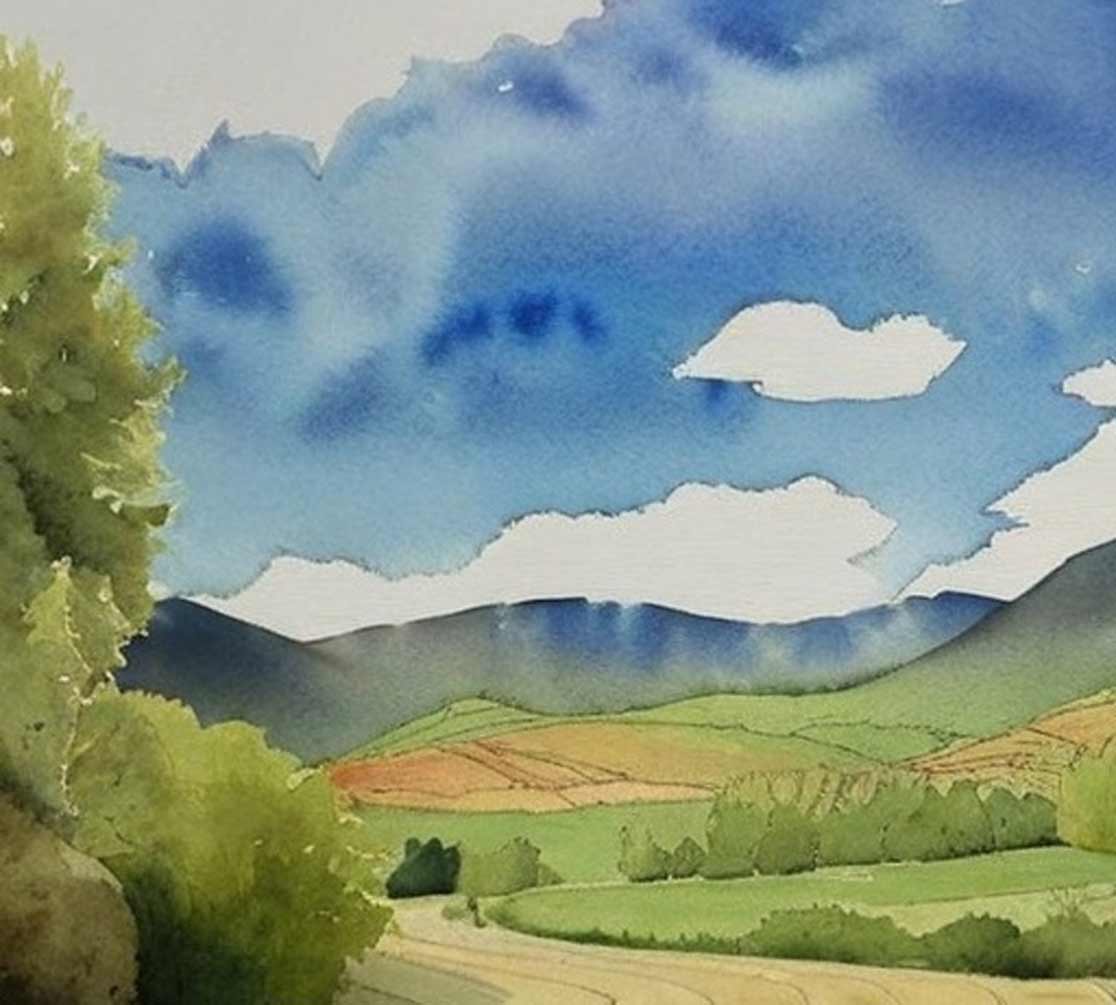
3. Gradated Wash
This landscape is done in several layers.
The sky is painted using the gradated wash method. It is darker at the top and gradually becomes lighter towards the horizon. To suggest diffused clouds, it is better to use the "saw wash", which allows you to utilize the brushwork more freely. The sky is rather light, especially closer to the horizon; this creates the aerial perspective. Its blue color continues to the outline of the yellow field.
Above the field there is a band of hills on the horizon. It is painted wet-on-dry over the blue sky. While this area is wet, the background trees and bushes are added dry-brush-on-mooist.
Once again, the field is painted with the gradated wash method, but unlike the sky, its tonal values are becoming darker from top to bottom, which follows the rules of aerial perspective. The grass under the tree is added dry-brush-on-moist.
The tree is painted on top of the dry sky. You can notice that the color of its foliage is muted and dark. In combination with colors and values of the under layers, this results in a rather low hue contrast and high light-dark contrast. At the top, the foliage varies in tones and random white spots are left unpainted by applying paints around them. Thin branches and twigs together with separate leaves are added sporadically, but just enough to indicate them instead of overloading this artwork with small details. Although the tree and its foliage look monochrome, it contains several colors, such as ochre, blue, and brown.
As you can appreciate, this artwork contains no green paint as it comes from a tube or pan. All green areas appear green without being so. This is one of the very important rules of landscape painting.
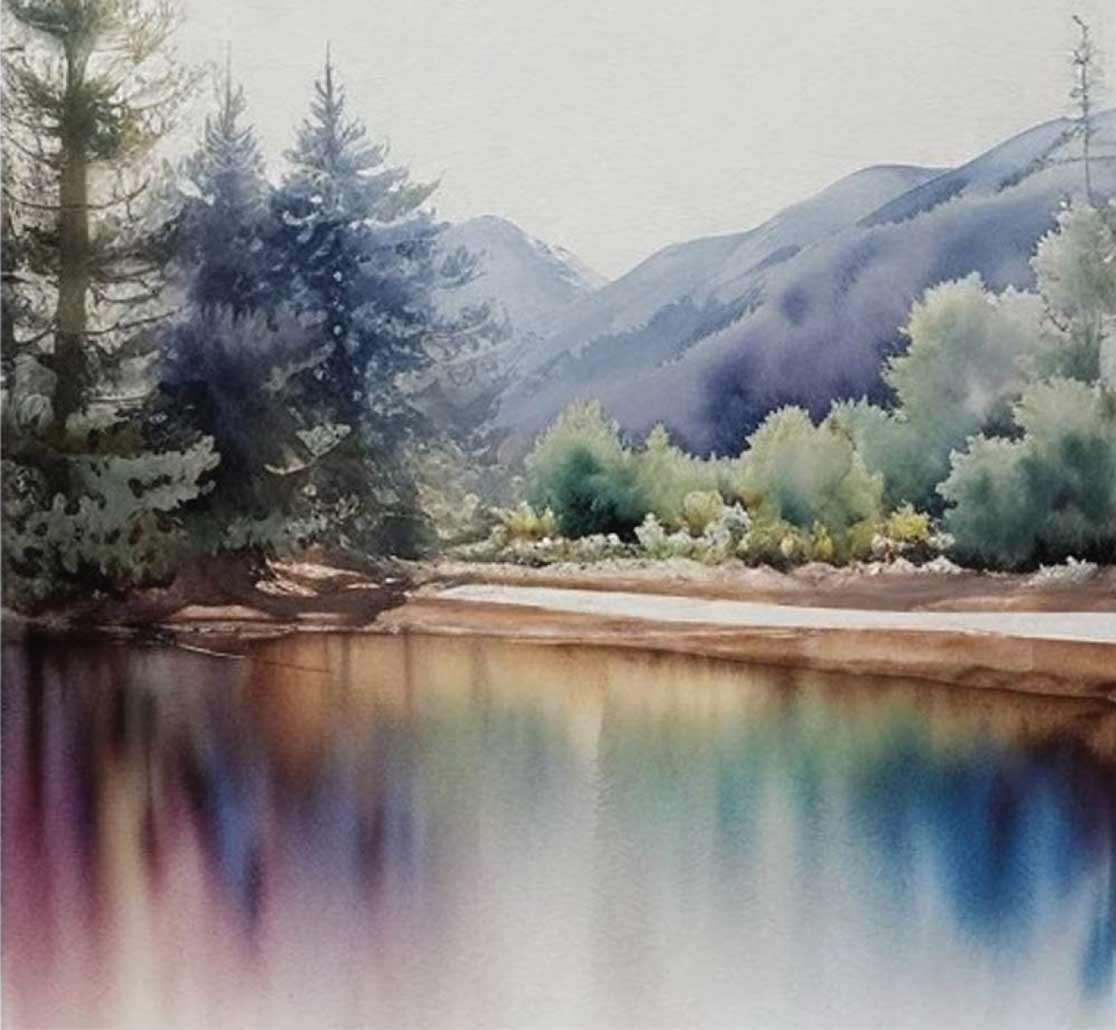
4. Retouching
This artwork is executed using several painting methods and techniques, including retouching, which is done on top of under-layers.
The first layer is applied wet-on-dry as a plain wash. It is very light and has muted-down yellowing grayish color. The white horizontal line that suggests the lake bank is preserved without masking by painting around it.
While paper is wet (satin), the background is painted wet-into-wet, including light ochre and blue hues of diffused bushes or hills on the horizon, the brown reflection under the foreground tree, as well as the trees on the left-hand side and their reflection on the water.
When paper dries from satin to moist, the upper silhouettes of trees are painted over the moist sky and fused with their middle-parts. The small dark fir-tree is painted dry-brush-on moist.
When this under-layer is dry, the foreground tree is depicted using the retouching painting technique. It is painted with tiny brushstrokes in yellow, red and brown colors.
The combination of free-flowing washes with fine-detail brushwork creates an interesting effect in this artwork.
5. Negative Painting
Many watercolor artists use masking fluid to preserve light areas of an artwork. The result seldom looks good because of sharp borders of masked spots. Such borders can be diluted and softened up to some degree, which often looks muddy. If you can avoid using masking fluid, it is better to use other techniques of preserving white. In this artwork, I will show you one good example of "Negative painting", which eliminates the need in masking.
Check out how trees and bushes on the lake bank are painted. The process goes from light to dark, which is the preferred way in watercolor painting. The body of a bush is painted in light green color, which is not pure green, but a mix of yellow and blue paints. When this area dries to some degree - moist or fully dry, depending on the desired effect, the area around the bush is painted in some darker color. The outline is accurately preserved. For example, the blue mountain above the bushes on the right-hand side is darker than the bushes' outlines. These outlines are painted "negatively" or around them. The same goes where two bushes overlap one another. The bush in front is painted around by the bush behind it. The same can be noted about the branch of the fir-tree on the right-hand side.
Negative painting not only speeds up landscape painting, but also dramatically improves the artwork's appearance compared to fluid-masking.
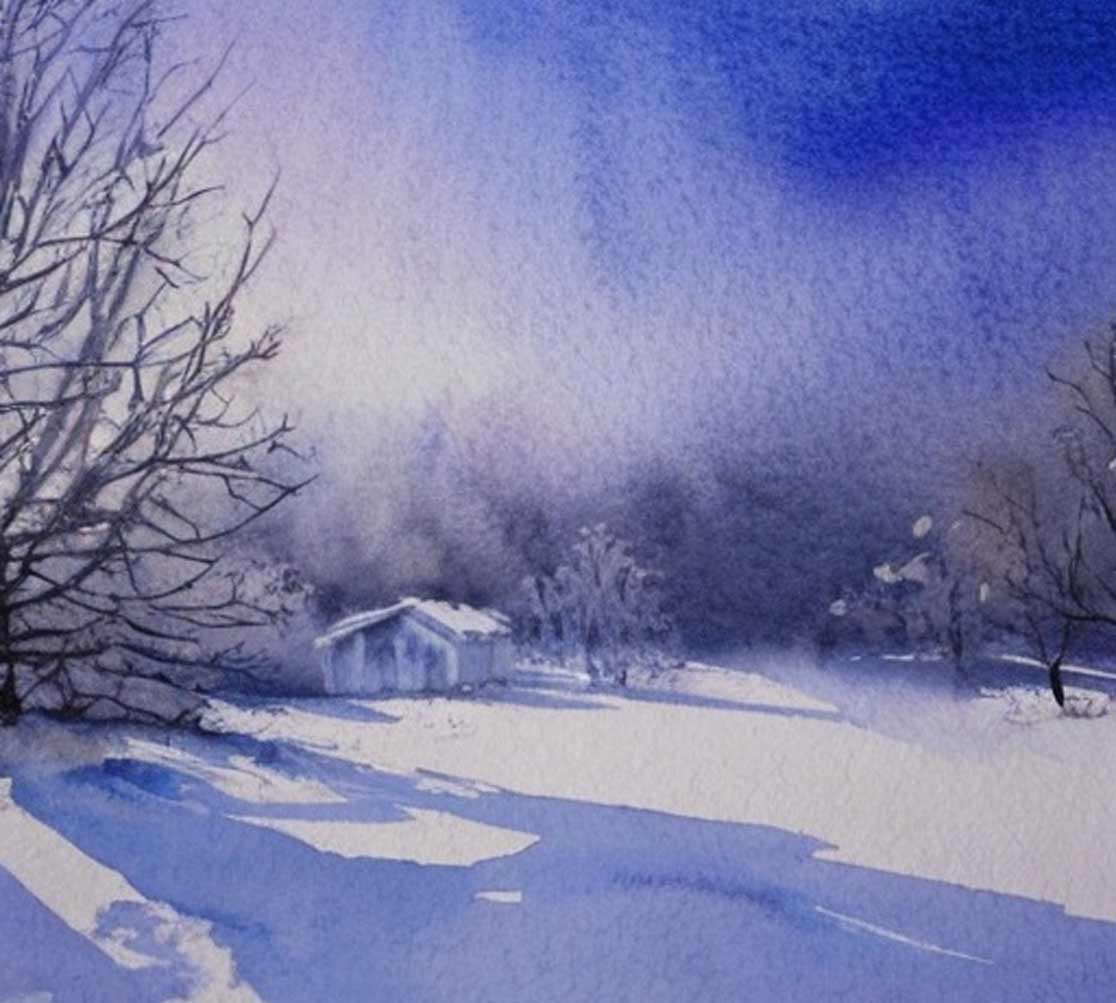
6. Granulated Wash
When it comes to some special effects in watercolor painting, good knowledge of your art materials greatly helps. Some paints have bigger, more coarse and heavy particles of pigments than others. Such heavy-pigment paints tend to granulate in washes. This creates an interesting effect, which watercolor is famous for.
Check the texture of the dark sky in this artwork. Blue paint granulated because of pigment particles collected in depressions of the paper tooth. To achieve such an effect, it is better to use heavy rough watercolor paper, although cold pressed (CP or NOT) paper is also suitable for this purpose. Not every paint would granulate, but you can use the granulating medium to enhance such behavior of paints with heavy-particle pigments. Granulation requires time; that is why wet washes that remain wet longer give time for pigments to separate.
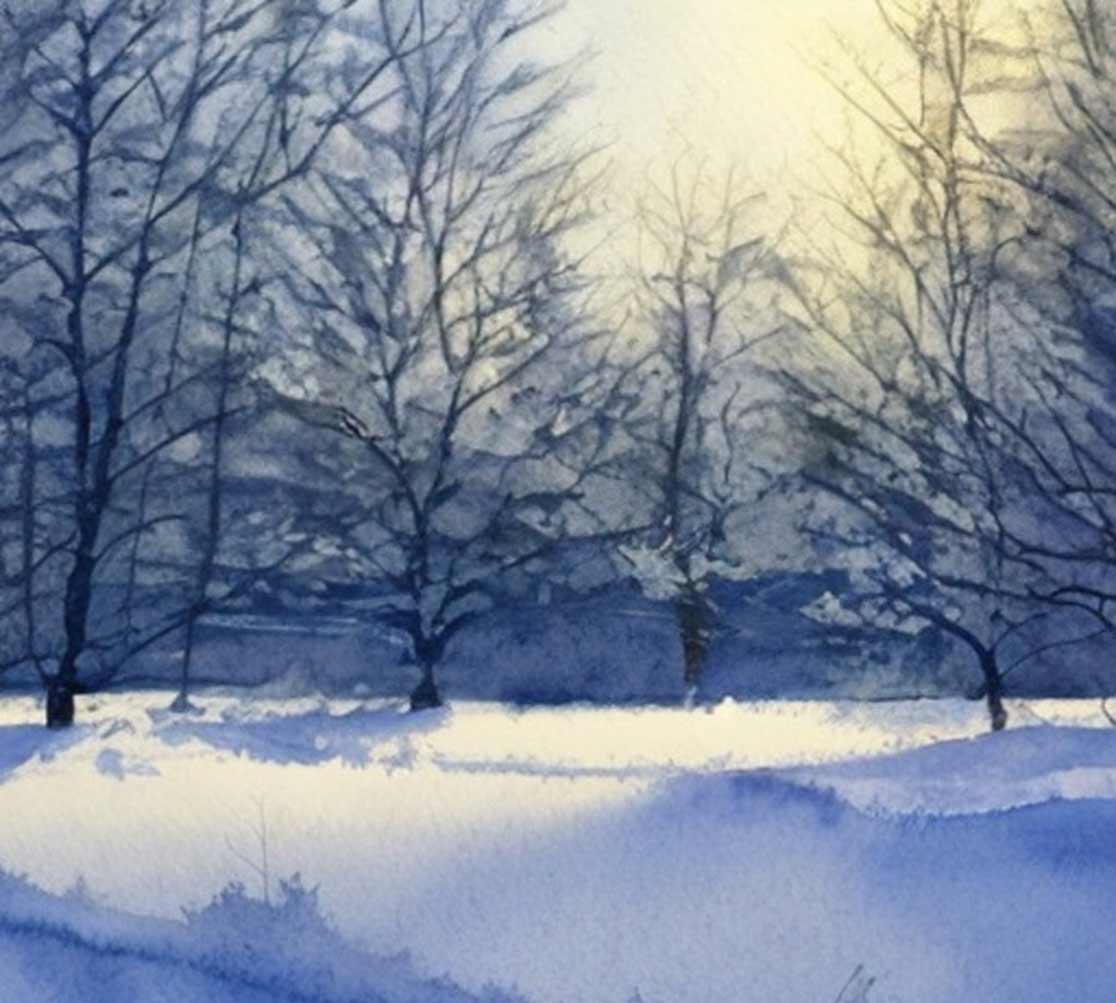
7. Dry-Brush-on-Moist
Dry-Brush-on-Moist is one of the most advanced watercolor painting techniques that requires a lot of practice and understanding of the right balance of water on paper and on the brush. This artwork commenced with the wet-on-wet wash in light yellow that covered the whole paper sheet. Into this yellow, the light-blue mix was added wet-into-wet both in sky and on the ground.
Details in dark blue colors were added when the paper turned moist. "Moist" is when the paper surface no longer reflects light, has no water on the surface and does not feel wet on touch, but remains cold because water continues to evaporate. For this technique to work, the amount of water on the brush should be minimal. The amount of pigment, though, could be whatever is required - from heavy-loaded for dark details to tiny amounts for lighter passages. In any case, there should be almost no water in the brush belly. Because paper dries quickly, the time for dry-brush-on-moist painting is limited. To prolong it, you may wet the paper on its reverse side from time to time. Adding water on the front side of paper will result in cauliflower back-runs, and may spoil an artwork.
8. Pen and Wash
Pen-and-wash is probably the fastest way of watercolor painting. An artwork starts with drawing in pencil, pen, or some water-resistant ink. Such under-drawing is an integral part of an artwork; it should be sufficient for its sake. On top of a drawing, you can apply free-flowing washes in color. These washes could be precise or diffused. You can even disregard contours and outlines and paint beyond boundaries. Keep an eye on the tonal values though. Colors are less important than values. Because such a brushwork can be as vague as you like, it can be done very impressionistically and fast.
The sequence of steps can be reversed with the Wash-and-Outline technique. First, you can apply washes in color and when the surface is dry, draw on top without worrying that water can dilute pen marks.
In this example, you can notice that drawing is rather minimal; there are only pencil marks on the ground. Nevertheless, such lines describe this ground rather well. Also, it is better to avoid line-work of clouds and paint them free-hand.
To learn how to paint in watercolor, enroll now
Watercolor Academy Online Course
A self-study, self-paced course where you can learn how to paint in watercolor by watching video lessons and doing assignments
- Unlimited access to 80 watercolor painting video lessons
- Lifetime membership without deadlines
- Unlimited support from the Academy tutors
- Constructive critique of your artworks
- Member access to the Academy's Art community
- Place in the Academy's Students Gallery
- Exclusive members-only newsletter and bonuses
- Watercolor Academy Diploma of Excellence in your name
One-time payment - Lifetime membership
$297 USD
ENROLL NOW
Personal Tutoring online + Online Course
One-to-one, unlimited and custom-tailored to your skills and needs Personal Tutoring by the Watercolor Academy teachers
- Everything in Online Course, plus:
- Dedicated team of art tutors
- Assessment of your current level of art skills
- Personalized curriculum tailored to your skills and goals
- Up to 100 art tasks with by-task assessment
- Unlimited one-to-one personal coaching with detailed per-task instructions and feedback
- Artwork critiques and results-oriented guidance
One-time payment - Lifetime membership
$997 USD
ENROLL NOW