Watercolor Academy Online Course
A self-study, self-paced course where you can learn how to paint in watercolor by watching video lessons and doing assignments
$297 USD
ENROLL NOWA self-study, self-paced course where you can learn how to paint in watercolor by watching video lessons and doing assignments
$297 USD
ENROLL NOWOne-to-one, unlimited and custom-tailored to your skills and needs Personal Tutoring by the Watercolor Academy teachers
$997 USD
ENROLL NOWBy Vladimir London, Watercolor Academy tutor
In this video, you will discover how to paint a watercolor portrait step by step
Before I show you how to use the alla prima painting technique, I will first make a special frame to stretch wet paper. Here's the full-sheet artwork. It measures 75 by 57 centimeters. The dimension I would like to use is a half-sheet. So, it will measure 57 by 37 and a half centimeters. To make a frame, I will use wooden planks. This one measures 30 millimeters by 14 millimeters. The smaller plank is 20 by 9 millimeters. You do not have to use exactly the same dimensions. It just happened that they had these planks in a local store. Here's the bigger frame. All that is left is to assemble it. I will now glue and staple the corners. It will take a few minutes for the glue to dry. Here's the first frame. Its corners are strictly perpendicular. I'm quite happy with the result! I will make the smaller frame in the same way. A rectangular board is cut to fit the inner size of the bigger frame. I painted two frames in white for two reasons. First, water resistant paint will protect the frame. And secondly, white color would be less distracting, so I could concentrate on the colors of the artwork. When paint is fully dry, I can apply self-adhesive rubber bands. These bands are used to isolate the windows and doors, but for the purpose of this creative task, these bands will give good grip and hold stretched paper in place.
With two frames complete, I would like to test how this construction will grip the paper sheet. With a little pressure on the wooden frame, it holds the paper sheet so well! I'm very much impressed by how this frame performs. All that time I invested in cutting and gluing the frame will pay off. Also, there are no marks or impressions from the rubber bands. This is very good!
Now, the interesting bit. I'm planning to use the painting technique that is called "Dry-brush on moist." For this technique, I will need paper to remain moist for a long time. That is why inside the frame, between the paper sheet and the water-isolated wooden board, there will be wet sponges. These sponges will help to keep moisture level constant for many hours; at list this is my theory. The frame, board and sponges are ready. If this equipment performs well, I will use this frame for years to come, painting half-sheet size watercolor artworks. To see if this frame does the job, let's test it.
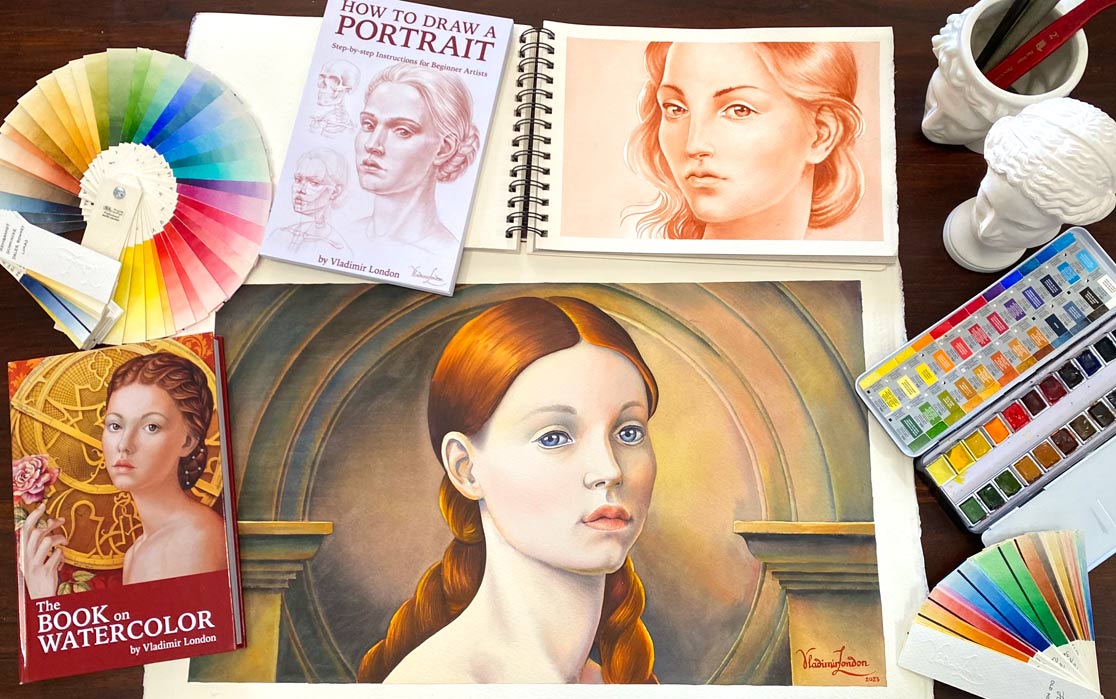
Here is the portrait I would like to paint. This drawing is transferred on the 300 gsm 100% cotton rough watercolor paper.
First, I will wet the paper sheet. For this purpose, I will use a wide flat brush. Because this paper is rough, it takes water readily. It is important not to over soak it. You may notice that I protected the outer border of this drawing with the masking fluid. This has to be done before wetting the paper. I have to say that masking is optional, but I would like to have a very clean margin edge for this artwork. When the front side is wet, I can turn the sheet over and wet its back side. After wetting this paper, I will wait for several minutes, to give time for the sheet to expand in size. While the paper sheet is soaking and expanding, I can prepare the frame for painting. A sponge soaks a lot of water; it will be wet for a very long time.
By this time, the watercolor paper sheet has expanded in size. It is still wet and ready for painting. I place this sheet between two frames, right on top of wet sponges. I will need a few brushes. For the dry-brush-on-moist painting technique, two or three brushes will be enough.
Regarding colors, this will be a low chroma artwork. I will select two or three main colors and thereafter will add some more colors as necessary. The phthalo blue and English red will be the main color pair. These colors are almost complementary and will give nice chromatic gray.
When painting with the dry-brush-on-moist watercolor technique, it is very important to keep the right balance between water on paper and on the brush. Because the paper sheet is moist, the amount of water in the brush should be minimal. I absorb the excess water from the brush belly with a paper napkin.
This is rough texture paper. Because it is moist it will absorb paint readily. Pigment particles will sink into the paper fibers and with time tonal values will become lighter. Actually, they will become almost twice lighter. That is why I apply such dark values now. You can also see that there is very little water on the palette. Paint doesn't flow. I also keep the brush almost dry. I use a wooden plank as a support for my hand. It is placed on the frame, which makes the painting process easier.
The dry-brush-on-moist is a rather advanced way of painting. If you would like to learn nine watercolor painting techniques and five different methods, take the Watercolor Academy course. If you want to improve your watercolor art skills, you need talented art teachers. And we have the best course for you - Watercolor Academy personal tutoring. The skills you will learn here are not taught at contemporary art colleges. In this course, you will watch how professional artists create original paintings in front of your eyes, while explaining all you need to know about watercolor. The Watercolor Academy Correspondence Course is unique. Here, you will get personal one-on-one tutoring from the academy teachers, who will guide you step-by-step, task-by-task until you reach the advanced level of watercolor painting skills. You can study at your own pace, in the comfort of your home and receive an in-depth tutoring that will be custom-tailored to your level of skills and needs.
As a Watercolor Academy Correspondence Course student, you will receive:
Let's come back to the painting. Adding just a little bit of water, makes paint almost flow on the moist paper surface. This is good for painting big areas like this background, for example.
Once again, I am adding very dark colors in shadows. This color will become lighter when paper dries.
The background on the right hand side will be lighter. Such gradation from dark to light will make it a bit more interesting. When paper dries, I will decide whether to leave this background as is or make another glazing coat wet on dry.
With the background complete, it is time to paint a portrait. As you may notice, I cleaned up the palette for mixing new fresh colors. The paper surface is still moist. That is why I will continue this painting using the dry-brush-on-moist technique. For this technique, I need very little water on the brush. Also, you can see that the paint on the palette doesn't flow. It has a minimal amount of water as well.
I will test how the paper surface takes paint by painting the hairstyle. Then, I will continue with the face. Although this color looks a bit yellow, it will become much lighter, almost white when it dries. When painting portraits, colors are less important than tonal values. If you misjudge some color, but get all the values right, the portrait will look realistic regardless.
The moist paper surface accepts paint very well. The colors are intermixed on paper and the gradations between colors and tonal values are very smooth.
In real life, cheeks are a bit more pinkish than the forehead. That is why I used a bit more yellow for the top part of the face and added more red for the cheeks.
How to paint realistic portraits step-by-step using different painting techniques is demonstrated and explained in depth in the multiple video lessons of the Watercolor Academy online course. Also, those students who take our personal tutoring, get far more advanced teaching on this subject. They learn various techniques and methods of painting and study professional portrait painting know-how that is not taught in art colleges.
The first layer of this portrait is complete. Now, I will deepen the tonal values, by painting on top.
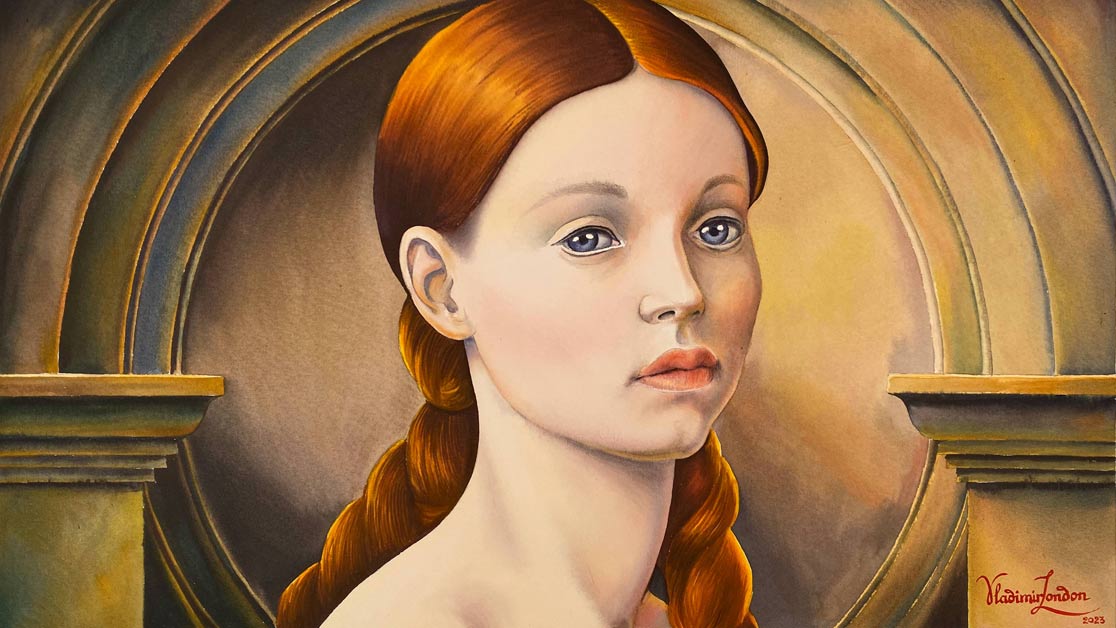
The right-hand side of this portrait will be in shadow. That is why I made the background on this side lighter than on another. Here's one good tip for you. If you paint some object, it will look better if its dark side would be lighter than the bordering background, while some other light part of this object will be lighter in tone than the background that surrounds it. So, on the right hand side the face will be darker than the background. Although on the left hand side, there will be a dark hairstyle, I will make some highlights that will be lighter than the dark background that borders the hairstyle.
How to paint eyes is an interesting topic. There are many know-hows and trade secrets when it comes to painting eyes in watercolor. Those secrets are fully revealed in the Watercolor Academy personal tutoring course.
One of the main junior mistakes is making eyes too light. This looks spooky. The eye is essentially a ball. As a ball, it will always have some dark areas that are in shadow. Also, there is always the casted shadow underneath the upper eyelids.
A good painting is always well-drawn. If you have weak drawing skills, no bright colors or amazing watercolor painting techniques would make your artwork professional. It will look amateurish simply because it is not possible to hide poor drawing under good colors.
If you feel that your drawing skills should be improved, we have two great drawing courses for you! In the Drawing Academy, you can learn fundamental principles of constructive drawing, including perspective, proportions, anatomy for artists, rules of golden proportions, professional tonal rendering techniques and much more. In this course, there are 45 video lessons that you can watch as many times as you want. There are no deadlines, no time pressure. You can study drawing at your own pace. You will have a lifetime membership and can rely on the unlimited personal support, which includes your artworks critique and answers to your art questions. If you would like to see what this course is about, get free drawing video lessons
Another drawing course you do not want to miss is the Life Drawing Academy. This course is especially helpful if you already have some basic drawing skills and would like to learn how to draw realistic portraits and figures. There are two courses in this academy - the Online Course and the Correspondence Course.
In the Online Course, You will get a lifetime access to 52 figure and portrait drawing lessons. In these lessons, you will learn the figurative know-how that is no longer available at the contemporary art colleges. By watching the online course video lessons, you will learn constructive drawing principles of figurative drawing. The course instructors will show you how to draw realistic bodies and faces step by step. If you would like to see what the Life Drawing Academy Online Course is about, check the free video lessons
If you are serious about getting the best drawing skills you possibly can, there is one art course that stands head and shoulders above others - Life Drawing Academy Correspondence Course. This course is suitable for artists of all levels. In this course, your drawing skills will be assessed and a personal drawing curriculum will be designed just for you. This curriculum will take into account what skill gaps you have, what you need to learn and what goals you have. You will get dedicated art teachers who will walk you step by step all the way until you reach the advanced level of drawing skills. You will have a lifetime membership and can study at your pace. And the best thing is, you will get all this for a one-time low payment. There is no other personal tutoring course that gives so much and costs so little.
The portrait is complete and the paper is dry by now. As you see, I removed the sponges for paper to dry. I would like to apply one glazing layer on top of the background. This wash will unite different colors and make architectural details less prominent. I will use this mop brush for the wash. It has a sizable belly and takes a lot of water. For the wash, I will use three primary colors - red, blue and yellow. The choice of colors is not accidental. Using three primaries, it is possible to mix whatever colors you need. The painting technique I'm using for this glazing layer is called the variegated wash. As it comes from its name, this wash is about mixing colors directly on paper, by overlapping different colors, so the paint flows from one color to another, making smooth gradations without borders. This glazing layer deepens up the tonal value of the under-layers as well as slightly mutes colors because complementary colors are applied on top of each other.
To learn more about professional watercolor painting techniques and about color theory, take the Watercolor Academy course
The artwork is done now. I will wait for the paper to dry before disassembling the frame. The paper is fully dry and I can take apart the frame. I have to say that this frame performed really well. Paper was stretched securely at all times. Soft rubber bands inside the frame gripped wet paper as good as the dry sheet. At the same time, there are several improvements I would like to make next time to make this frame even better. If you would like to see what those improvements are, leave your comments under this video and subscribe to this channel to be notified when the next watercolor painting video lessons are available to watch.
I am very pleased with the frame. It left a minimal impression on the paper sheet despite it being very soft when wet. All that remains now is to take off the masking film to reveal the clean white border of this portrait. Here's the finished watercolor portrait. I hope you enjoyed this video. Please give a like and subscribe to this channel. If you would like to watch more free watercolor painting lessons, get your free access to the Watercolor Academy demo. In this demo, you will get a free video lesson on how to paint a portrait in watercolor, a lesson on golden proportions, a demonstration on how to paint sunlight in watercolor, a tutorial on how to paint horses in watercolor and above all, you will get my Book on Watercolor absolutely free of charge!
A self-study, self-paced course where you can learn how to paint in watercolor by watching video lessons and doing assignments
One-time payment - Lifetime membership
$297 USD
One-to-one, unlimited and custom-tailored to your skills and needs Personal Tutoring by the Watercolor Academy teachers
One-time payment - Lifetime membership
$997 USD


