Plain Wash in Watercolor Painting
Article by Vladimir London, Watercolor Academy tutor
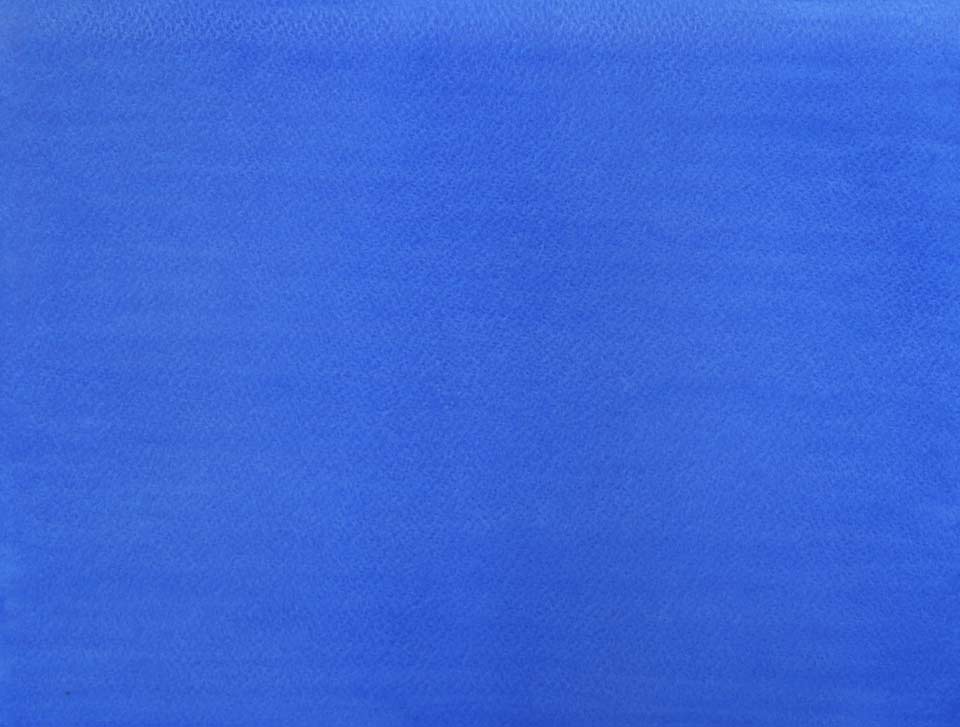
Plain Wash is the simplest of all watercolor washes. When you need to a paint layer with an even color and tone, this is the one to use.
The plain wash can be applied to moist, dump or dry paper.
First you need to mix enough paint to cover the whole area. With time, you will get a feel for how much is required. Anyway, it is better to prepare more paint than needed rather than run out before the wash is complete.
For mixing, you can use a saucer or a coffee cup. Try the color mix on the same sort of paper as you will be using for the artwork.
When the paint is ready, position the board with the paper at about a 15-degree tilt.
Fully load a soft squirrel round or mop brush with paint and accurately run with its tip in a horizontal line from one edge to the other at the top of the paper. The brush should be big enough to hold enough paint for the entire brushstroke length. Your goal here is to make the whole line in one go with a smooth hand movement.
Gravity will do its job: paint within the stroke will accumulate at its lower edge, forming the bead.
The tilt of the board should be shallow enough to prevent the paint from running down in one or several drops and be steep enough for gravity to help you.
Load the brush once again with paint and run another line in the same direction from edge to edge. The second brushstroke should go just below the previous line, overlapping slightly without leaving any gaps. Paint from the previous line will run into the second one and intermix, accumulating at the lower edge. Keep the brush pressure and speed of the movement constant and the same as before. Also, make sure your line is perfectly horizontal.
Load the brush and repeat the previous step as many times as is required to cover the whole surface that you intended for a plain wash line by line. Keep an eye on the bead. It should be present at all times. In a way, this is a "bead wash".
It is important to keep going steadily without any delays. Even a short break in the process, for instance to mix another portion of paint, may result in a visible horizontal border between steps in an interrupted wash.
It is important not to go over already painted areas; you must keep going to the end applying new brushstrokes. Any gaps between the lines have to fixed immediately. If you notice a gap between previous brushstrokes, leave it until the paint dries. Afterwards, you may accurately fill in the gaps with the same paint using a small brush. Any accidental runs downward should be fixed with a sponge or blotting paper, which needs to be at hand.
When I show this technique, students sometimes ask me if the brushstrokes should go in one direction (from left to right for right-handed artists) or can be done in two ways, changing direction for every line. Both methods are effective. One direction is easier, though, because you can achieve more uniform brushstrokes when repeating the same movement over and over again.
When you reach the end of the wash, load less paint on the brush for the last couple of lines. This is to gradually lessen the quantity of paint that accumulates at the lower edge. The excess paint at the bottom border can be absorbed with a semi-dry brush. Keep an eye on this border as it might be necessary to remove paint a couple more times while the wash dries.
If you want to achieve a deep transparent color, it is better to do so in layers of plain washes. Do not strive for a dark tint from the first go. Several layers of lighter tints will give a better color and a smoother tone than a single-layer dark wash.
Before applying the next layer of a wash, make sure that the previous one is completely dry.
Illustration by Vladimir London, Watercolor Academy tutor
There is a variation of this method and I will call it the "saw wash". It is ideal for covering big areas in a very even tone without getting accidental horizontal lines along strokes. It is not taught at most art institutions and is probably the trade secret of Russian watercolor school. You are about to learn a wash approach from the previous century that will give you the edge when it comes to big watercolor artworks.
As previously described, the necessary amount of paint has to be prepared and the board needs to be tilted about 15 degrees.
The first line of wash is done as described above: just run a fully loaded brush from edge to edge.
The next stripe of paint is not made in a single horizontal line, but with short diagonal brushstrokes tilted at about a 45-degree angle. The bead will resemble the teeth of a saw, hence the wash name. Every stroke overlaps with the bead above at the top and overlaps the previous diagonal stroke at its side. There should be no gaps left between strokes. Brushstrokes are diagonal, but gravity pulls the paint downward forcing it to flow from one brushstroke to another. This results in better mixing and therefore in more even tone throughout the wash. It is essential to keep the bead flowing from stripe to stripe and apply the brushstrokes in one direction.
Of course, the "saw wash" can also be done in multiple layers by painting over the dry surface with as many washes as required to build up a deeper tone.
Plain washes are good for areas with one tone and color. In many cases, however, a uniformed tone is not the aim of your creative task. Aerial perspectives require a gradation of tone. This brings us to the next method: the gradated wash.
To learn how to paint in watercolor, enroll now
Watercolor Academy Online Course
A self-study, self-paced course where you can learn how to paint in watercolor by watching video lessons and doing assignments
- Unlimited access to 80 watercolor painting video lessons
- Lifetime membership without deadlines
- Unlimited support from the Academy tutors
- Constructive critique of your artworks
- Member access to the Academy's Art community
- Place in the Academy's Students Gallery
- Exclusive members-only newsletter and bonuses
- Watercolor Academy Diploma of Excellence in your name
One-time payment - Lifetime membership
$297 USD
ENROLL NOW
Personal Tutoring online + Online Course
One-to-one, unlimited and custom-tailored to your skills and needs Personal Tutoring by the Watercolor Academy teachers
- Everything in Online Course, plus:
- Dedicated team of art tutors
- Assessment of your current level of art skills
- Personalized curriculum tailored to your skills and goals
- Up to 100 art tasks with by-task assessment
- Unlimited one-to-one personal coaching with detailed per-task instructions and feedback
- Artwork critiques and results-oriented guidance
One-time payment - Lifetime membership
$997 USD
ENROLL NOW