Watercolor Academy Online Course
A self-study, self-paced course where you can learn how to paint in watercolor by watching video lessons and doing assignments
$297 USD
ENROLL NOWA self-study, self-paced course where you can learn how to paint in watercolor by watching video lessons and doing assignments
$297 USD
ENROLL NOWOne-to-one, unlimited and custom-tailored to your skills and needs Personal Tutoring by the Watercolor Academy teachers
$997 USD
ENROLL NOWVideo lesson by Vladimir London
In this video lesson, you will discover how to paint horses in watercolor.
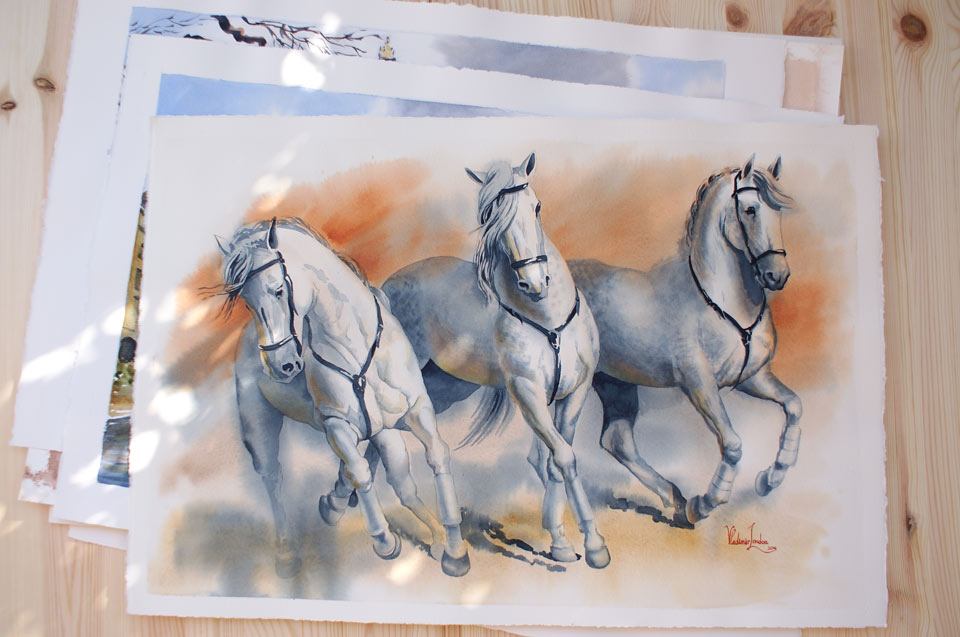
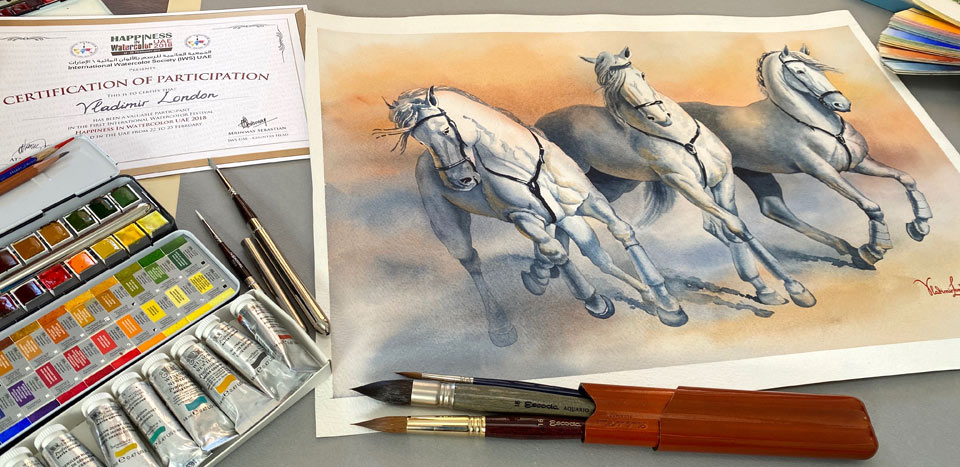
Here is the finished artwork that I will achieve by the end of this video.
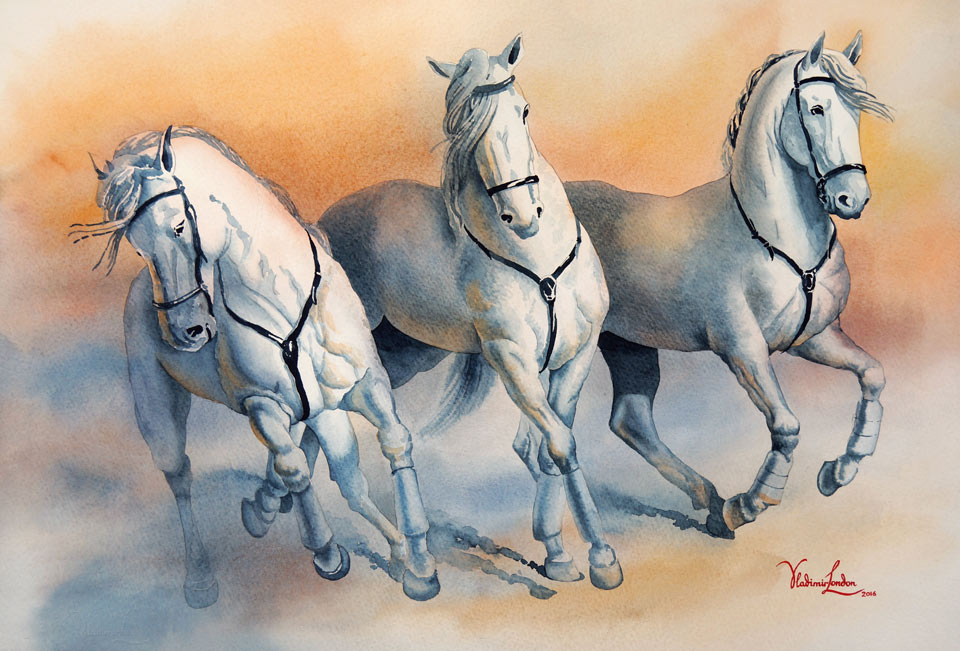
This watercolor painting was exhibited at the international watercolor exhibition in Dubai, United Arab Emirates, where I participated as the United Kingdom member of the International Watercolor Society. I took the inspiration for this artwork from one corrida in Spain, where a beautiful, talented and hardworking Lea Vicens demonstrated her skills of riding horses and fighting the bulls, in front of the eyes of so many very impressed spectators. She had worked so hard, for so many years, in order to achieve mastery, and now she is at the top of her league.
I will now show and explain how I created this artwork, starting with the underpainting which was done wet-into-wet. A sheet of high quality, 100% cotton watercolor paper is already stretched on the wooden board, and I am preparing a couple of colors, including Burnt Umber and Payne's Gray. Since I will be using the wet-into-wet painting technique, I must prepare the paper surface first. To preserve the white horse in the middle, I apply water with a flat natural-hair paintbrush along the outline of the horse. The horse on the right-hand side is fully covered with clean water. After this, I load the Burnt Umber paint onto the round brush, and add this mix into the wet area, starting from the border between dry and wet surfaces. The mix of this brown paint is quite light in tone; this is because I am planning to paint this artwork in layers, and this first wash is the underpainting. The purpose of an underpainting is to give a tonal foundation for the future artwork; hence why I am not interested in colors at this step, but in tonal values. I now use a smaller synthetic paintbrush, to paint darker tones of the horse's neck and head. At this step, I am not interested in small details; it is more important to depict big shapes. For this underpainting, I want brushstrokes to have softly diffused borders, hence why I am painting on the wet surface.
So far, I have used only one color – Burnt Umber. Since this is not a monochrome artwork, it is time to add colder Payne's Gray to this painting. It is also painted wet-into-wet, to indicate the shadow areas. Because, for now, I am using only two colors – brown and dark blue – it is very easy to decide where each color should go. This is the outdoor scenery, which is lit by warm sunlight. So, I am using the warm brown color for all light and mid-tone values; and when it comes to the shadows, the cold dark blue color is used. Such a very simple division of warm and cold colors makes the painting process much easier. By now, the paper surface is dry, so I wet the entire surface of the watercolor paper sheet with clean water, using a flat wide synthetic brush. The painted area is also covered in water.
I now change the painting style to more impressionistic, making wide diagonal brushstrokes with a flat brush. Such freehand brushstrokes add dynamism to this artwork. I am using a light tint of Burnt Umber, which is applied without any attention to the underdrawing. The wide strokes span across all three horses and the background. In order to make the underpainting more saturated in color, I add Raw Sienna paint. Its bright and warm yellow brown color creates an impression of the arena, with yellow sand lit by sunlight. I also introduce another earth pigment into this artwork – red ochre. It is also painted wet-into-wet, and the brushstrokes' borders spread out, becoming softer on the wet paper surface. I apply this pigment with a flat paintbrush, which holds less water than the equal width round brush. This is a really good painting tool to keep the water balance under control. Alternatively, if I were to load more water onto the brush, the paint will end up running down in streams uncontrollably. In order to perform this step of the exercise, the wooden board is tilted at about 15 degrees, allowing gravity to be my co-creator – therefore, should I make the brush too wet, paint will end up flowing down.
I am adding the red ochre paint between the horses, creating an impression of a warmer abstract background. While the paper surface is still wet, I am using the wiping-off technique to remove some of the pigment off from the paper surface. For the best results, this should be done with a clean damp brush, which wipes off the pigment from the paper more easily. After this step, I thoroughly dry this artwork.
By now, the paper surface is fully dry and to continue painting wet-into-wet, I first apply clean water with a soft wide synthetic brush, making very gentle brushstrokes, ensuring that I do not dilute and wash out already-painted pigments. When the paper surfaced is moistened once again, I continue painting wet-into-wet. In this step, I would like to add some shadow areas and add texture to the background. For this purpose, I use the dark blue Payne's Gray paint. This pigment is also applied with a flat brush, but this time, I load slightly more water than previously, for the brushstrokes to diffuse softly. The dark cold paint is also used for the casted shadows under the horses. As previously, I do not pay too much attention to the linear drawing. It is about big masses of soft shadows, not the precision of lines. The dark blueish gray color works very well for shadow areas of the horses. It gives a strong light-and-dark contrast, as well as the contrast between cold and warmer colors. For more information, color theory is explained and demonstrated in depth, in multiple videos of the Watercolor Academy course.
With the underpainting in place, I will now paint wet-on-dry. So far, the underpainting, which was done wet-into-wet, doesn't look much like three horses. At this stage, the artwork is rather impressionistic – it solves the question of where warm and cold colors are, and also indicates the locations of dark and light tonal values. However, it does not describe the composition and design in detail. This is what I will do in the second half of this artwork – continuing to paint wet-on-dry. In fact, what I am doing is not actually painting, but drawing in color with the paintbrush. This resembles the wash-and-outline watercolor painting technique. This technique is fully described and illustrated in multiple video lessons of the Watercolor Academy course.
Since what I am doing is drawing rather than painting, the end result will very much depend on my drawing skills. As they say, a good painting is well-drawn. If you feel that your drawing skills have to be improved, you can check the Drawing Academy online course. In this course, you will learn how to draw whatever you see or imagine, using constructive drawing principles, rules of perspective, composition, Golden Proportions, proficient techniques of tonal rendering, and much more. In this drawing course, you can also rely on unlimited personal support from the Academy tutors, which includes critique of your artworks at no extra cost. In the Drawing Academy, you will have a lifetime membership, and can study at your own pace, in the comfort of your own home.
Coming back to this artwork, you can see that I am depicting small details using a dark blue pigment, which is Payne's Gray. The correct sequence of making a watercolor artwork is by painting it, starting from light areas, and progressing to dark ones. The light tonal values of the horses are already in place, so all that is left is to add mid-tones and dark tonal values. This is where the theory of tonal values becomes very handy, particularly as any three-dimensional object, for example a sphere, will have different tonal values, depending on the direction of light. Such tonal values can be divided into three groups: light, mid-tones and dark values. Each group can be further subdivided: for example, 'light' includes 'high-light', 'light' and 'local-light', whereas the mid-tones have 'light half-tone', 'middle half-tone' and 'dark half-tone'. In turn, the dark values group can be subdivided into 'core shadow', 'form shadow' and the 'accent'. I should also mention the cast shadow, which includes dark umbra and diffused penumbra. Note that this classification is subjective, and may vary from one art school to another.
Nevertheless, as we return to the artwork, we find all of those values as well. Each part of the horse's body has one or another tonal value. For example, here is the light, here is the shadow, and here is the reflected light. I would like to point to your attention that, although the reflected light is in shadow, it is not cold in this artwork. Instead, it is depicted with the warm color. This is because such light is reflected by the orange background and the yellow-brown arena.
To create the texture of the horse coat, I am painting it with a dry brush. The term 'dry brush' does not literally mean that the brush is totally dry; in fact, it is moist. While I am not able to squeeze a single drop of water from its belly, some of the moisture remains on the brush. The paint on the palette is also moist, but not dripping wet. I pick up the paint from the palette with the tip of the brush, and touch the paper surface with the brush very lightly. Such short and light brushstrokes create the texture that I would like to have for the horse coat.
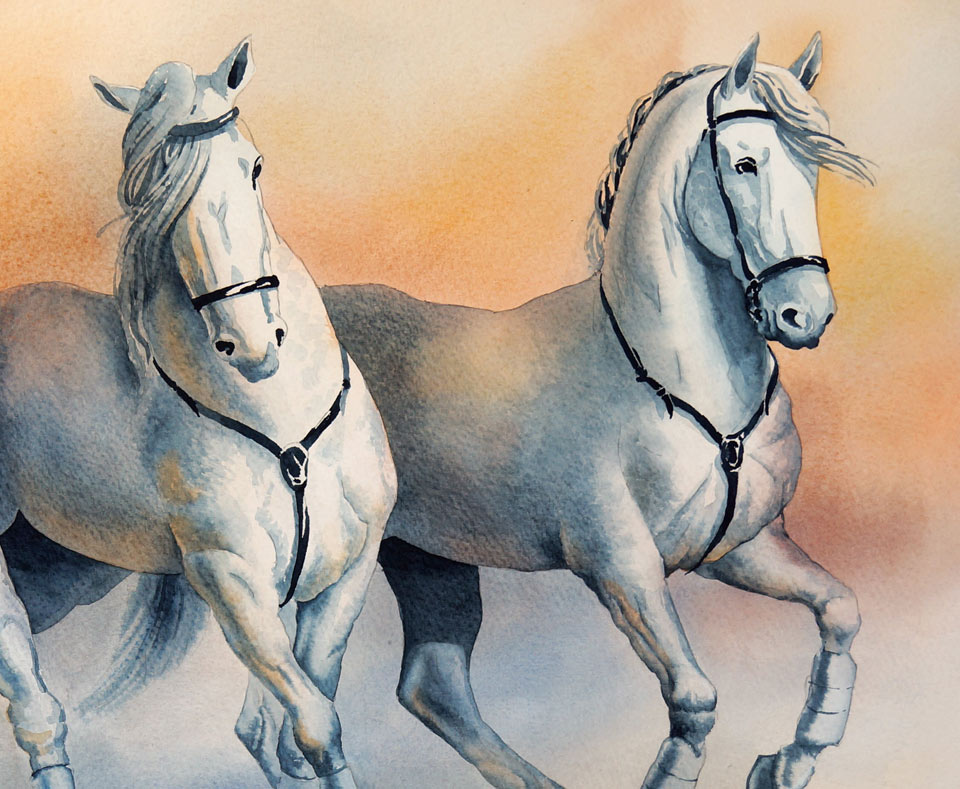
For the thin lines and smaller details, I am using a smaller round brush. To allow an artwork to appear more realistic, you have to keep in mind, and apply the rules of, aerial perspective. The aerial perspective describes how objects appear depending on the proximity to a viewer. According to its rules, faraway objects are lighter in tone, cooler in color, have less visible details, and less contrast. On the contrary, objects on the foreground have stronger contrast, darker and warmer colors, and all details are better defined.
An aerial perspective happens because the atmosphere influences the appearance of objects. It is very important to indicate this perspective in landscape artworks. Of course, you will not see in real life, an aerial perspective on a shallow object, such as a horse's body. Nevertheless, as an artist, you have full creative license to depict not only what you see, but what you know. Therefore, since you know the rules of aerial perspective, you can paint the horse's head more defined, with more details, and in higher contrast, than its hind legs. For example, the horse on the left-hand side is fully complete, but you can see that I didn't emphasise every part of its body with the same attention. The head, the neck, and the front legs, are all more defined than the rest of the body; this is not accidental, but done on purpose, to create an illusion of an aerial perspective, and to give three-dimensional depth to this animal.
A self-study, self-paced course where you can learn how to paint in watercolor by watching video lessons and doing assignments
One-time payment - Lifetime membership
$297 USD
One-to-one, unlimited and custom-tailored to your skills and needs Personal Tutoring by the Watercolor Academy teachers
One-time payment - Lifetime membership
$997 USD


