Watercolor Academy Online Course
A self-study, self-paced course where you can learn how to paint in watercolor by watching video lessons and doing assignments
$297 USD
ENROLL NOWA self-study, self-paced course where you can learn how to paint in watercolor by watching video lessons and doing assignments
$297 USD
ENROLL NOWOne-to-one, unlimited and custom-tailored to your skills and needs Personal Tutoring by the Watercolor Academy teachers
$997 USD
ENROLL NOWVideo lesson by Vladimir London
In this video lesson, you will discover how to apply a plain wash in watercolor.
I will show you how to produce a very smooth wash with a round brush.
The watercolor paper sheet is fixed to the board, and the board itself should be tilted at about 15 degrees to the horizon, so that the board's top edge is higher than the bottom one. Apart from the brush and watercolor paper, you will also need a saucer to pre-mix any watercolor paint of your choosing. For example, I used the blue pigment PB15, but you can choose any other pigment that you would like to make a wash with. On the watercolor paper, I am marking two vertical lines to indicate the left and right boarders, but this is completely optional.
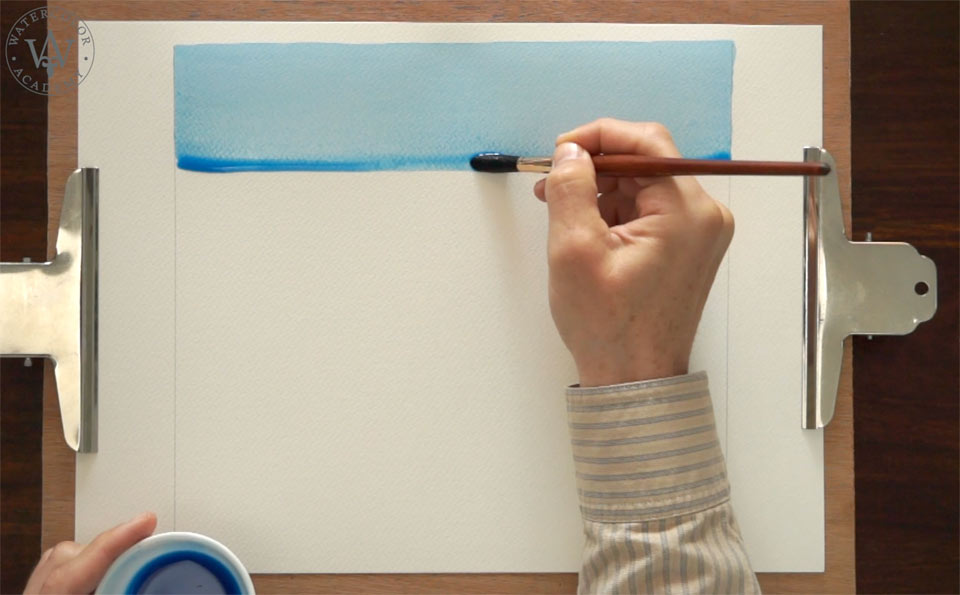
It is very important to have a sufficient quantity of the paint mix that will last for the whole wash. In order to apply the first horizontal brush stroke along the top edge of the paper, I thoroughly mix paint in the saucer and fully load the brush. This first brush stroke should have enough paint to form the bead at the bottom. With the first stroke in place, I can now continue the wash, applying the next stroke. With a confident movement at a constant speed, I paint a second brush stroke so that it overlaps the first one, and allows the paint bead to flow down to the bottom edge. I reload the brush and apply the next stroke, slightly overlapping the previous one. Once again, the bead flows down from one brushstroke to another – we can name this painting method the 'bead wash'.
There are several rules you need to follow to achieve a very smooth and plain wash.
First, you need to mix a sufficient amount of paint.
The board should be tilted at about 15 degrees.
You will then need to form a bead, starting from the first brush stroke.
For every next brush stroke, you need to load the brush with an equal amount of paint, and you should apply the paint onto the paper with a constant speed of brush strokes, slightly overlapping with the neighboring brush strokes. This overlap should be approximately one third of the brush stroke width.
You have to make sure that there are no gaps between brush strokes; if you have left any accidental gaps several brush strokes above, do not go back to fix it until it dries. It is very important not to touch the wet paper until it dries, otherwise you will spoil the wash, instead of fixing it.
The speed of every brush stroke and timing between them should be constant, and depend on how fast the bead flows from one brush stroke to another. If you apply brush strokes too frequently and too fast, the paint may not have enough time to flow under the gravity and reach the bottom border of the current brush stroke. This might result in a stripy and uneven appearance of the wash.
Brush strokes should be made in one direction – from left to right, for example. However, painting brush strokes in one direction and then changing them in the opposite way, i.e. from right to left, also does the job, as long as you follow all of the previous rules. If you don't have enough experience in making plain washes, I would suggest to practice one direction brush strokes, from left to right if you are right handed, until you have the feeling of this painting method and can keep an eye on the bead to achieve a smooth tone. Once you have practiced this, you may experiment with the direction of strokes. Also, it is very important to make a full wash from the beginning to the end, without taking any breaks, during the process.
When you come to the end of the wash, load the brush with less paint, and do not load the brush at all for the final few brush strokes. Instead, continue using the bead that you already have on the paper surface. When you reach the very last brush stroke, the bead will continue to collect at the bottom edge of the wash. Accurately squeeze the brush belly between fingers to drain the excess water or absorb it using a paper towel, and then use the damp brush to take off the bead from the bottom edge. Also keep an eye on the bead, because after several minutes, it may accumulate once again. To prevent this, you need to absorb it with a damp brush from time to time, until the paper dries completely. Leave the paper to dry on the tilted board. Do not place it on the horizontal table because it might result in a back-run of wet paint.

So, this was the plain bead wash. It is the simplest kind of wash that you can use in order to cover large areas of an artwork, in one tone of any monochrome color. There are so many applications for this wash, including imprimatura, underpainting, glazing layers and so on. We will cover all those painting techniques later on in this Watercolor Academy course.
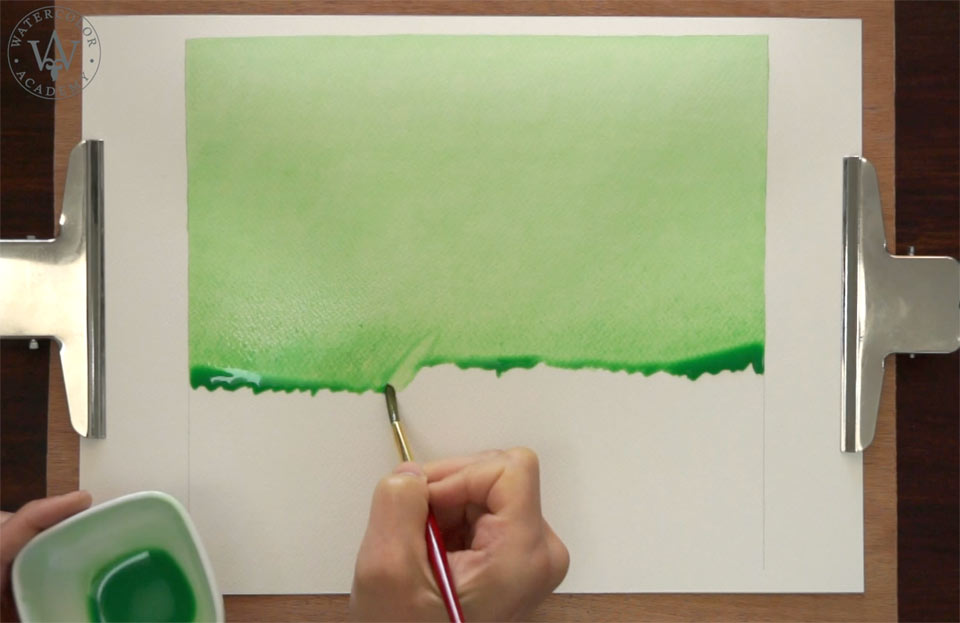
Here I will show you another method of making a plain wash. In the previous exercise, I used a medium-sized round brush. However, I will show you that, even with a smaller round brush, it is still possible to make a very smooth wash. As before, I have already undertaken all of the preparatory steps: fixing paper to the board, tilting the board at 15 degrees and premixing a watercolor paint in the saucer. This time, I am using a yellow-green paint containing two pigments – PG7 and PY3 – but you are welcome to use whichever paint you wish. Although you will find that finally grinded pigments and dyes are more suited for the plain wash, I paint the first couple of brush strokes in exactly the same manner as you have seen previously. I apply these brush strokes with a horizontal movement of the brush, loading them with paint to form the bead. However, I do not paint the following brush strokes with a horizontal movement. Instead, I paint short brush strokes at a roughly 45-degree angle. Because the small brush has a smaller belly, it holds less water, so I have to reload it more frequently. You can see that every brush stroke overlaps the top layer, as well as the previous brush stroke. With such strokes, I overlap about 50% of the beads of the top band. Also, I am checking that I do not miss any white gaps. If you accidentally leave some white unpainted spots, do not go back to fix them whilst the paper is still wet. Instead, keep going until the end of the entire wash, then let the paper dry and accurately fill the remaining white gaps with a small brush.
The board is tilted and the wet paint flows down, but the direction of strokes is diagonal. This means that there is an angle between the downward flow and diagonal strokes. This angle helps to intermix wet paint on paper more efficiently, which results in a very smooth wash. The bigger the brush size you use, the easier it is to make the wash. Therefore, I have chosen a very small, round brush to demonstrate to you that even with such an unsuitable instrument, it is possible to achieve a very even layer of paint without any visible brush strokes or gradations of tones.
Because of the diagonal direction of strokes, the line of the bead has a zig-zag pattern, like the teeth of a saw. Hence the name of this method, the Plain Saw Wash.
When you reach the end of the wash, do not load the paint brush, but continue using paint that is already collected in the bead. The amount of the bead may be sufficient to complete the job. Of course, it takes practice and experience to keep the bead collecting, but not running down, in uncontrollable streams.
When you reach the very end of the wash, the last stripe has to be painted with horizontal brush strokes. Such lines will level up the teeth of the 'saw', making a straight border at the bottom.
I hope that you can see the advantage of the saw wash, which gives a very smooth layer without any visible brush strokes or gradations of tonal values. The mechanics of this method mean that, in order to achieve a good result, even a small brush can be used.
To finish this wash, firstly I dry the brush with a paper towel and then use a damp brush to absorb excess paint at the bottom edge.
If you have never used the saw wash method before, I would highly recommend that you test and practice this painting method. This is because it can be applied in so many cases, including when you need big or small areas of an artwork to be covered smoothly.
When doing a plain wash, there are some mistakes that you should avoid. Make sure to pre-mix a sufficient quantity of the paint mix, because if you run out of paint in the middle of a job, it will be difficult to mix exactly the same tone. Also, during the time taken to re-mix the same tone as before, the paint will dry on paper, creating a clearly-defined border between the first and second parts of the wash, because the bead will have more time to sink into the fibres of the paper, and your next mix may have a different tonal value.
It is also wise to avoid misjudging the amount of water within the bead, as it may have either less or more water than needed. When the bead is insufficient, the paint will not flow between brush strokes, and if the bead is overloaded, it may run down in a stream of paint, which could be quite challenging to fix, especially if the paint is staining.
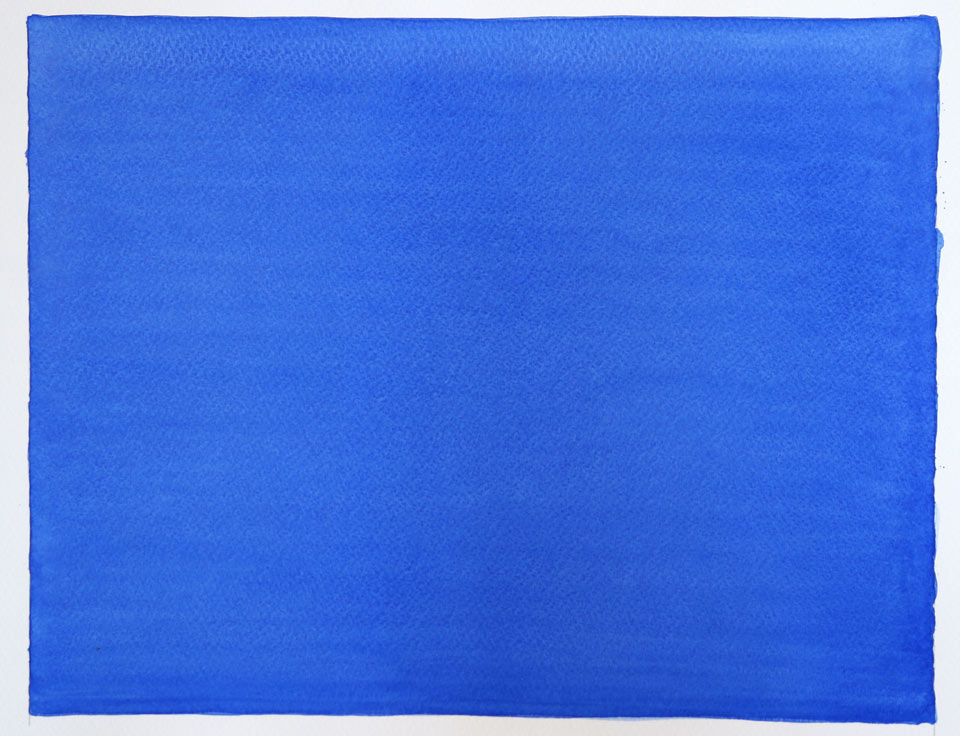
Here I will make another plain wash, to demonstrate how dark tonal values can be achieved, by applying several layers.
Once again, watercolor paper is fixed to the board, and the board is tilted to about 15 degrees.
This time, I will use blue ultramarine paint from Windsor & Newton mixed in the saucer, and I will apply this mix on paper with a round, synthetic brush. I will make a plain bead wash with horizontal brush strokes. As usual, the first stripe of paint is loaded with a mix, so that a nice, juicy bead forms at its bottom edge. Every next brush stroke will overlap the previous one, so that under gravity, the bead will flow from one stripe to another.
Because the ultramarine pigment is a bit heavier, and has coarser particles than the previous paints I have been using in this video lesson, this plain wash may end up with slightly visible horizontal brush strokes, which is still acceptable for the purposes of this exercise.
When the first wash is complete and the paper is fully dry, I can add another layer of the plain wash on top. To do so, I mix more pigment in the saucer and apply this mix in exactly the same manner as previously. It is very important to wait until the previous wash is totally dry, because otherwise, the next layer might run uncontrollably and the wash could be spoiled.
The creative task that I have in mind is to produce a deep and saturated color of 'blue ultramarine' across the whole area of this wash. To achieve such a deep tone, I will make several layers of plain washes. Of course, every layer has to be smooth and even, because the watercolor medium is transparent. All irregularities in any wash will show through.
A self-study, self-paced course where you can learn how to paint in watercolor by watching video lessons and doing assignments
One-time payment - Lifetime membership
$297 USD
One-to-one, unlimited and custom-tailored to your skills and needs Personal Tutoring by the Watercolor Academy teachers
One-time payment - Lifetime membership
$997 USD


