Watercolor Academy Online Course
A self-study, self-paced course where you can learn how to paint in watercolor by watching video lessons and doing assignments
$297 USD
ENROLL NOWA self-study, self-paced course where you can learn how to paint in watercolor by watching video lessons and doing assignments
$297 USD
ENROLL NOWOne-to-one, unlimited and custom-tailored to your skills and needs Personal Tutoring by the Watercolor Academy teachers
$997 USD
ENROLL NOWVideo lesson by Vladimir London
In this video lesson, you will discover how to paint an organic pattern illustration in watercolor.
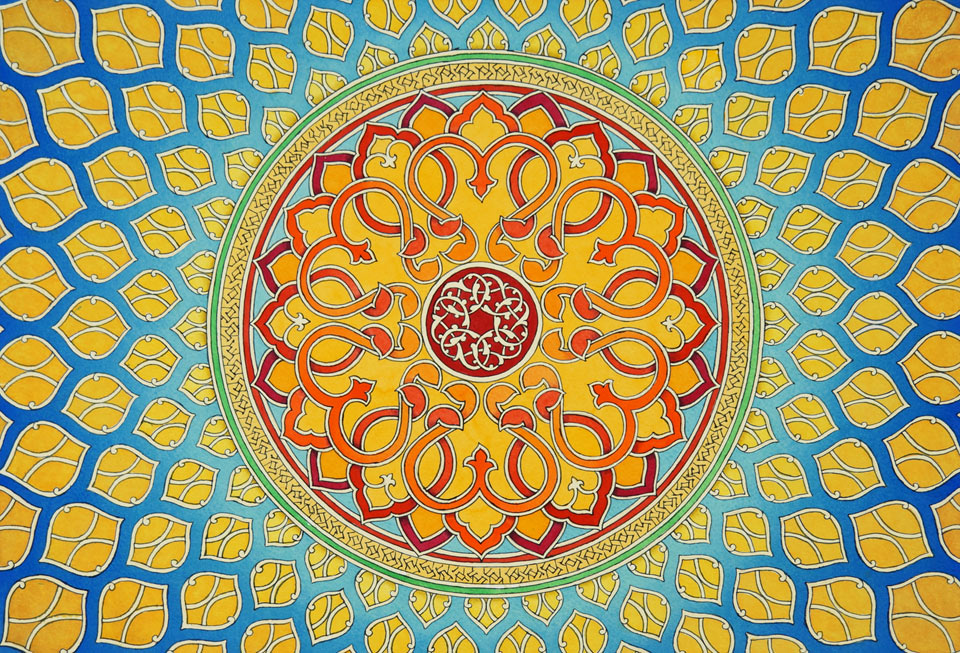
This is the finished artwork I will achieve by the end of this video.
First, I prepare a high quality watercolor paper sheet for painting. I place it back-side up and apply clean water with a flat, synthetic, wide brush to wet the entire sheet. This has to be done thoroughly, making sure that there are no dry parts left. When the paper absorbs the water, I then flip the watercolor sheet face-side up, to stretch it on the wooden board. For this purpose, I use synthetic tape, which is stapled to the board as well. Whether you decide to use a tape is totally optional. It will make it easier to remove staples when I finish the artwork.
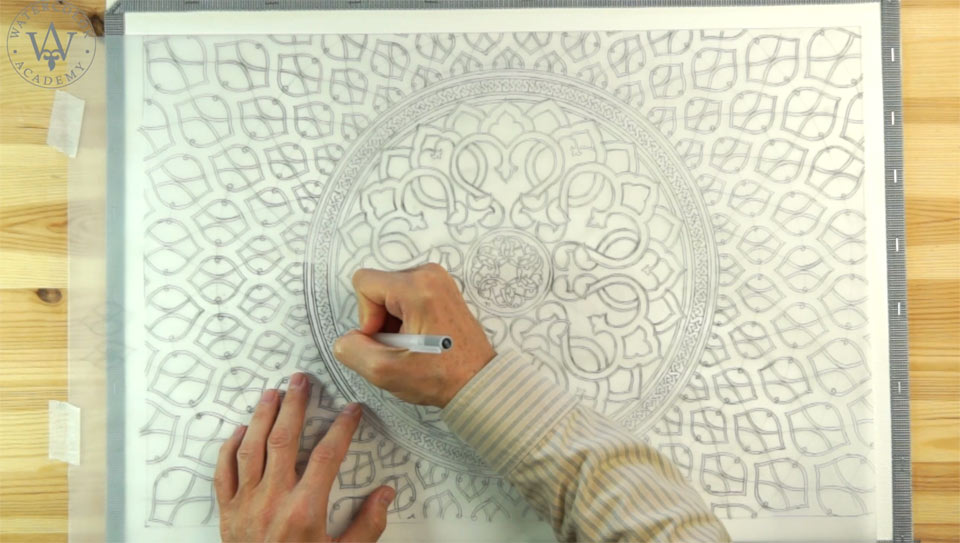
When the paper sheet is stretched, I leave it to dry for several hours. I am making the organic pattern drawing on tracing paper. Because this design is fully symmetrical, I can do it on one side of tracing paper. There is no need to repeat this drawing on the reverse side. When the drawing is complete, I transfer it onto the clean watercolor paper sheet, which is totally dry by now. I use a black pen to see which lines have been traced and which are remaining. The tracing paper sheet is fixed to the board with masking tape at one side, which makes it easier to flip open the tracing paper and check the progress and quality of the transfer. I make sure that I accurately outline every single line until the full design is transferred.
When the drawing is transferred, the tracing paper can be taken off and I can prepare for the imprimatura wash, which I will make using this round mop brush from Escoda. I premixed a very light orange tint that will be used to cover the entire watercolour paper sheet. The purpose of this painting layer is to make the paper off-white.
This plain wash starts with the first stripe of paint, which is loaded with enough liquid to form the bead. The board is titled at about a 15-degree angle, allowing water to flow down. Liquid paint collects at the bottom edge of the painted area. When a nice bead is formed, I continue with the saw wash. This wash is made in multiple diagonal brush strokes applied in horizontal bands. Liquid paint flows down under gravity, through the area of diagonal brush strokes. Because the angle of brush strokes is different to the direction of the paint flow, the paint intermixes very well directly on paper. This results in a smoother wash.
I keep going with this saw wash until the end of the paper sheet, covering it with a light and even coat of paint. Before reaching the very end, I stop loading the brush with paint and do the opposite – I take the paint from the paper with a brush and squeeze the brush back to the saucer. It is very important not to pull the brush hair, but gently squeeze it with fingers instead. After finishing this wash, I leave it to dry. When the paper is totally dry, I employ the ruling pen to apply the masking fluid. The ruling pen is a great tool for applying masking fluid because it makes long and thin lines of masking, is very easy to use, and is even easier to clean. When the masking film is totally dry, I turn the board 90 degrees to prepare it for the second wash. I am intending to make this wash in a light blue tint that is mixed from the Phthalo blue watercolor paint. I turned the board 90 degrees to have a shorter length for the brush strokes. Because this pattern is fully symmetrical, it doesn't make much difference as to which side the board should be facing upwards.
I make a plain wash using a saw brushstroke pattern; and now you can clearly see which design areas I masked with the fluid. I continue the plain wash from the top to the very end. Keep in mind that, to prevent having to stop in the middle of the job and re-mix any additional paint, it is quite important to have enough paint premixed in the saucer. I am now removing some of the excess paint from the paper by squeezing the brush to make it damp, and absorbing redundant drops from the paper surface. The plain wash will continue to the very end. The porpoise of this wash is to make a blue underplanting that will be a foundation for the following gradated wash.
This blue underpainting is now dry, and I will wet the paper surface with clean water, to prepare for the next wash. I premixed a slightly darker tint of blue paint and will use it for the gradated wash. I start painting from the bottom edge of the watercolor paper sheet, because I want this area to be darker, and gradually to become lighter closer to the center. With the gradated wash complete and fully dry, I can now take off the masking film because it is no longer needed.
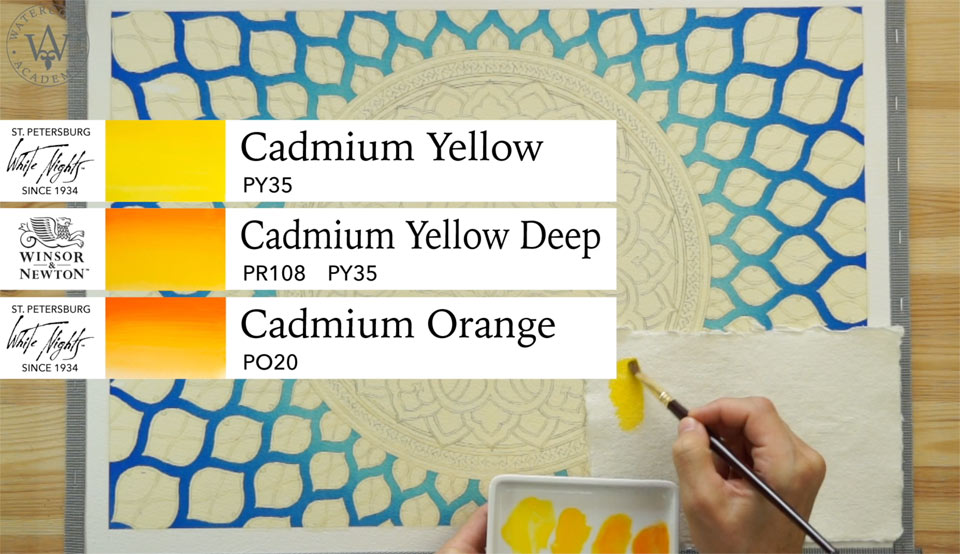
When the old masking film is fully removed, I apply a new masking film using a ruling pen, drawing thin lines of the design. For the next part of the organic pattern design, I will use four colors: Cadmium Yellow, Cadmium Yellow Deep and two mixes of Cadmium Yellow Deep with Cadmium Orange. This simple range produces a nice gradation from yellow to yellow-orange colors. Yellow colors will be used closer to the center and more orangey mixes for the peripheral design.
The task of filling in yellow color is quite simple; I just have to accurately apply the mixed paint with a small natural-hair brush within the boundaries of the blue borders. This task is rather mechanical and repetitive, so I will skip forward to the step where the yellow pattern is already painted. As you can see, the yellow color gradually turns orange the further from the center it goes. The next step is quite simple: I will meticulously add small elements to the organic-pattern design, painting in different colors with a small brush. So far, I have added green and red circles, and I will now fill in the yellow one.
A self-made wooden bridge is a great tool when you paint small details on a large-scale artwork. So that I avoid smudging wet paint on the paper surface, I rest my hand on the wooden bridge and continue painting whilst the previously-laid paint is drying. You can see that I am using small brushes which give me the necessary precision when painting tiny details. Because this pattern is very repetitive, I will not waste your time by showing how paint dries, so I will jump from step to step, to speed up this pattern painting demonstration.
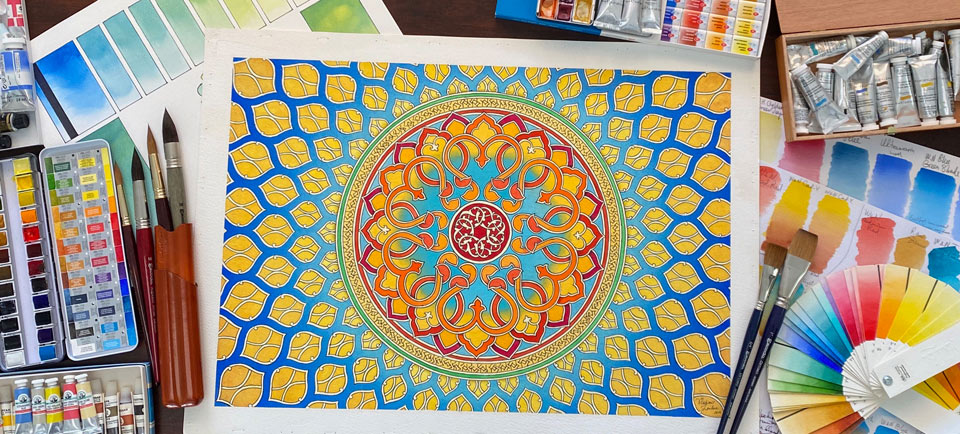
I am now filling in organic shapes with the Cadmium Yellow Deep paint. There are a lot of yellow elements within the central circle, meaning that completing this step is quite time consuming. Once this is finished, I now add red outlines to the yellow petals, starting with a darker and brighter red on the periphery, a lighter red color for the middle section and an orange color for the decoration in the middle.
The circle in the middle will be painted in a deep red color. I masked the organic decoration inside this circle. The next step will also be done in watercolor – not with a brush, but with a fountain pen. I have premixed a dark blue paint Indigo, and loaded the fountain pen with this mix. I can now continue working in watercolor, not painting but drawing with a pen. However, using a pen is totally optional – if you don't have one, you don't have to buy one. Instead, you can make the same thin lines with a small brush. This is a very simple artwork that requires patience above all, and making such pattern designs is a great way to improve your brush handling skills.
A self-study, self-paced course where you can learn how to paint in watercolor by watching video lessons and doing assignments
One-time payment - Lifetime membership
$297 USD
One-to-one, unlimited and custom-tailored to your skills and needs Personal Tutoring by the Watercolor Academy teachers
One-time payment - Lifetime membership
$997 USD


