Watercolor Academy Online Course
A self-study, self-paced course where you can learn how to paint in watercolor by watching video lessons and doing assignments
$297 USD
ENROLL NOWA self-study, self-paced course where you can learn how to paint in watercolor by watching video lessons and doing assignments
$297 USD
ENROLL NOWOne-to-one, unlimited and custom-tailored to your skills and needs Personal Tutoring by the Watercolor Academy teachers
$997 USD
ENROLL NOWVideo lesson by Vladimir London
This video lesson is special. Here, you will learn how to turn a watercolor painting into a mixed media artwork.
I will show you how to do it using the example of this picture.
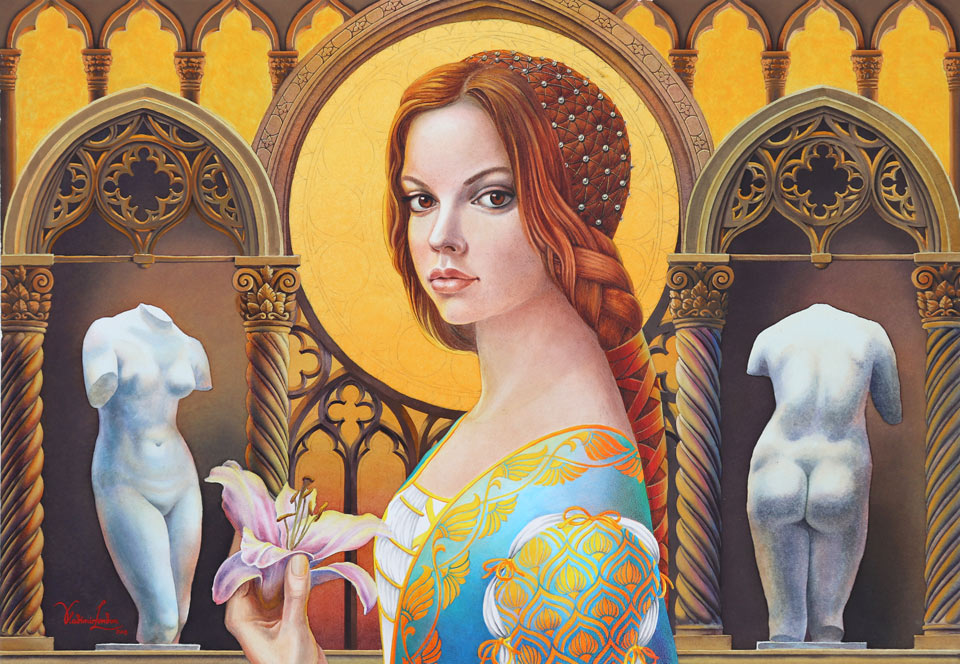
Let's say you have spent a lot of time designing a beautiful composition and would like to make a really great watercolor artwork. But, during painting, something happened not as intended and you realized that this piece you put so much effort into has been ruined. Watercolor is an unforgiving medium. Fixing mistakes by painting over them is not always possible. So, what to do and how to fix a watercolor that went beyond repair? To show you what can be done, I decided to make this painting. I will do it in watercolor first and, later, show you a few techniques that might save your piece of art.
To begin with, I'm making a very light watercolor wash with a blue color. After this wash, I'll wait for the paper to become totally dry. Then, I premix five different colors and now I'm using these colors to add the second layer of the randomly designed variegated wash. For this artwork, the choice of five colors is not as important. You can see that I have two cold and three warm mixes. This multicolor underpainting is very light. It will almost disappear under the next layers. The purpose of this wash is to achieve a single tone, multicolor background that will add a colorful texture to the artwork without influencing its tonal values.
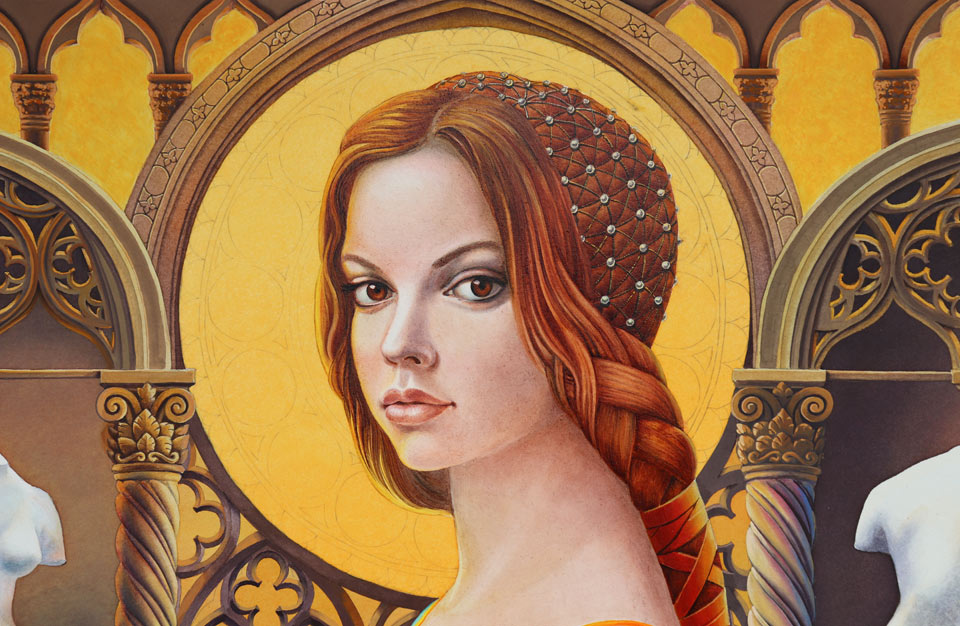
The name of this piece will be "The Renaissance Portrait" and, to me, Italian art of the 15th Century has a warm feeling to it. So, to ruin this artwork, I will go not warm and light but dark and cold. That is why I'm applying probably the least suitable dark and dirty colors to paint light windows that would look much better in yellow. Later, when this paint dries, I will show you how to fix this seemingly irreparable mistake. For now, let's continue with other areas of this artwork. I'm applying a yellow color for the niche where this ancient statue stands. Then, I deepen the tonal values to finish the niches with the statues. The yellow color I had in mind for the windows is applied here. Now, I will do the column and then come back to the top windows that need some fixing.
Because there is no way I can make them light and yellow by painting over with transparent watercolor, I have to do a dramatic alteration by filling those windows with white gesso, the same gesso that is used to prime a canvas for oil painting. Now, I can apply a rather creamy layer of yellow watercolor pigment to make them the color I had in mind. Of course, this is not the preferred way to make a watercolor artwork. This white gesso priming does not look the same as white watercolor paper and I'm only showing it to you to demonstrate how it's possible to fix mistakes that are not otherwise reparable.
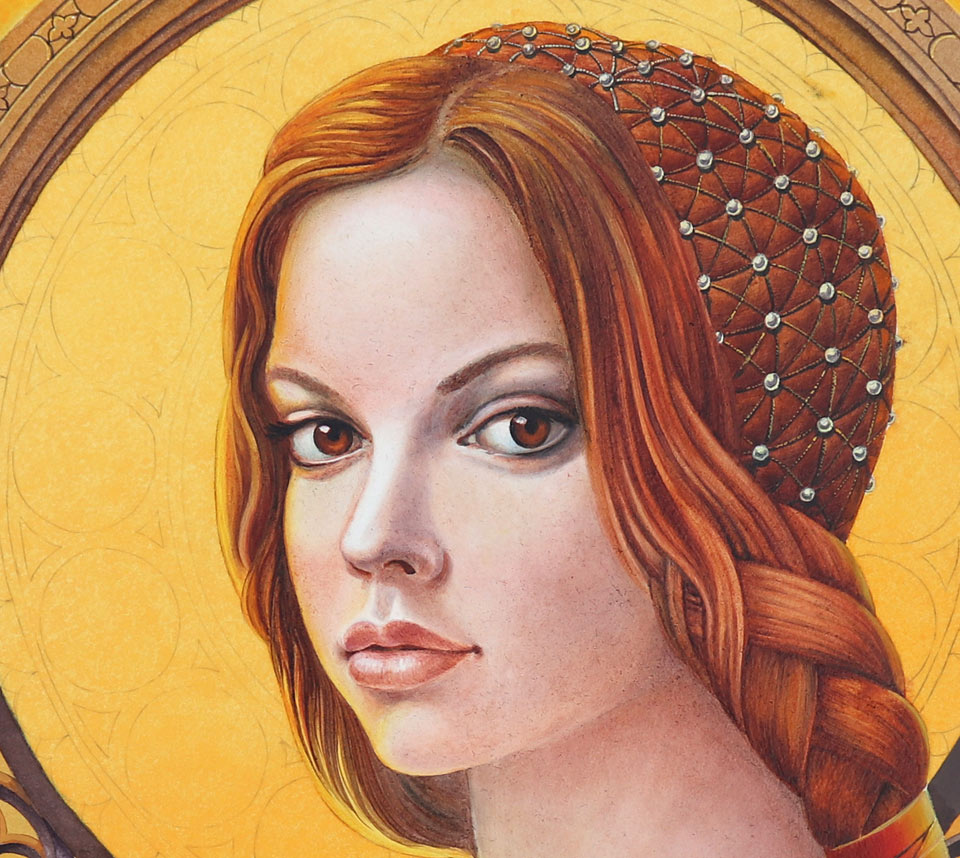
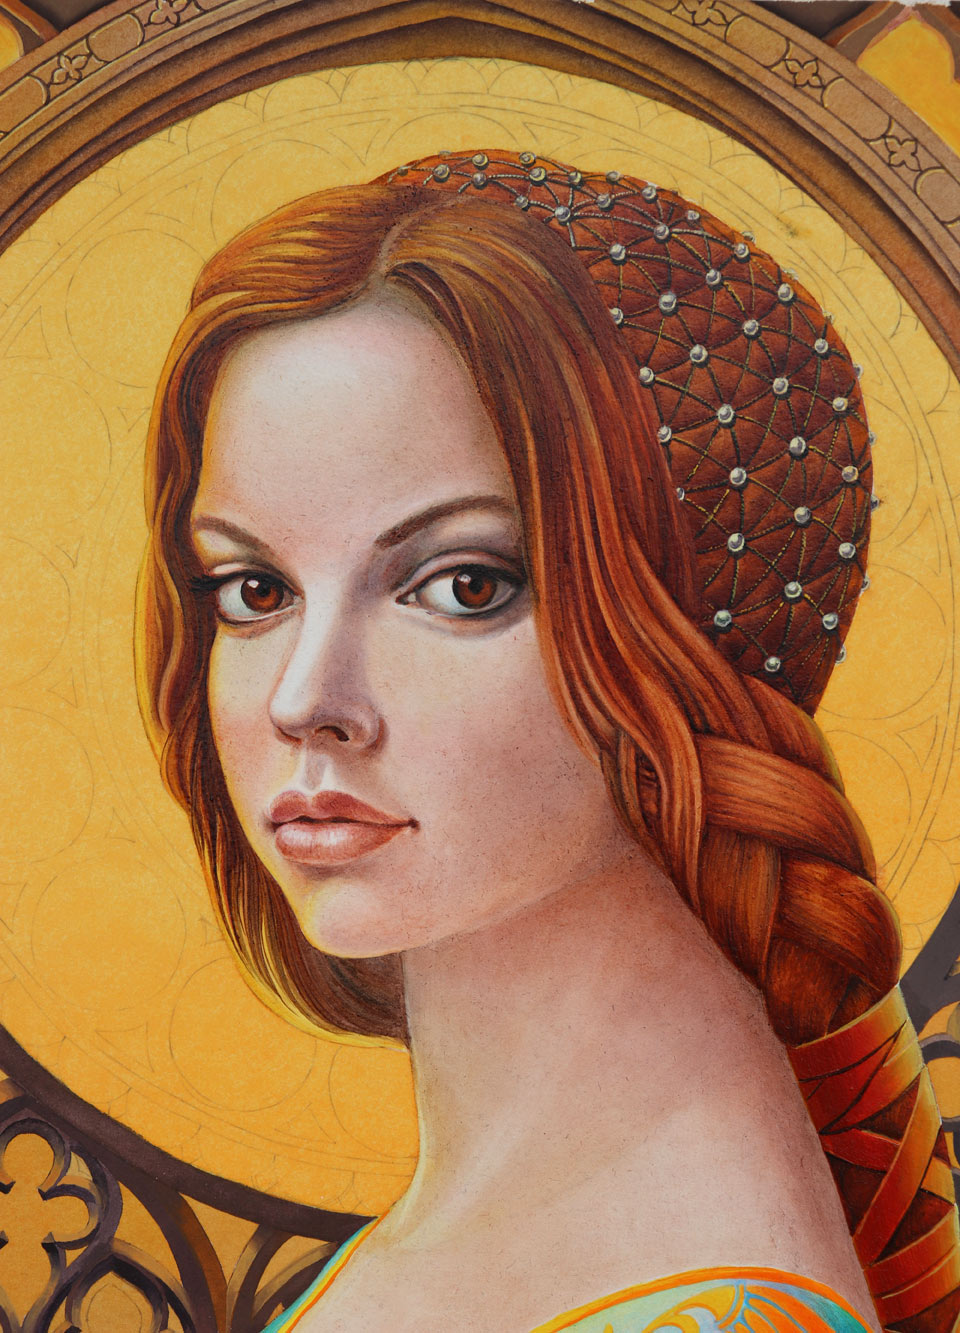
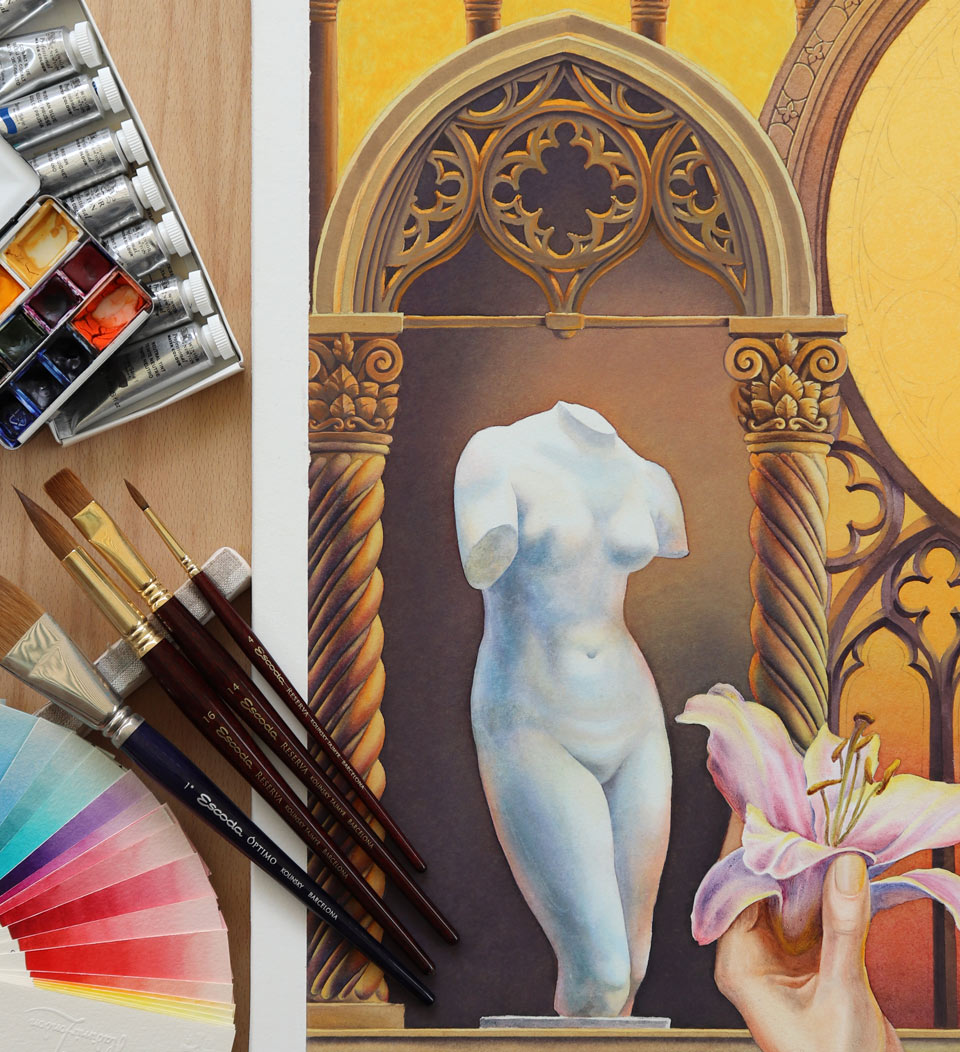
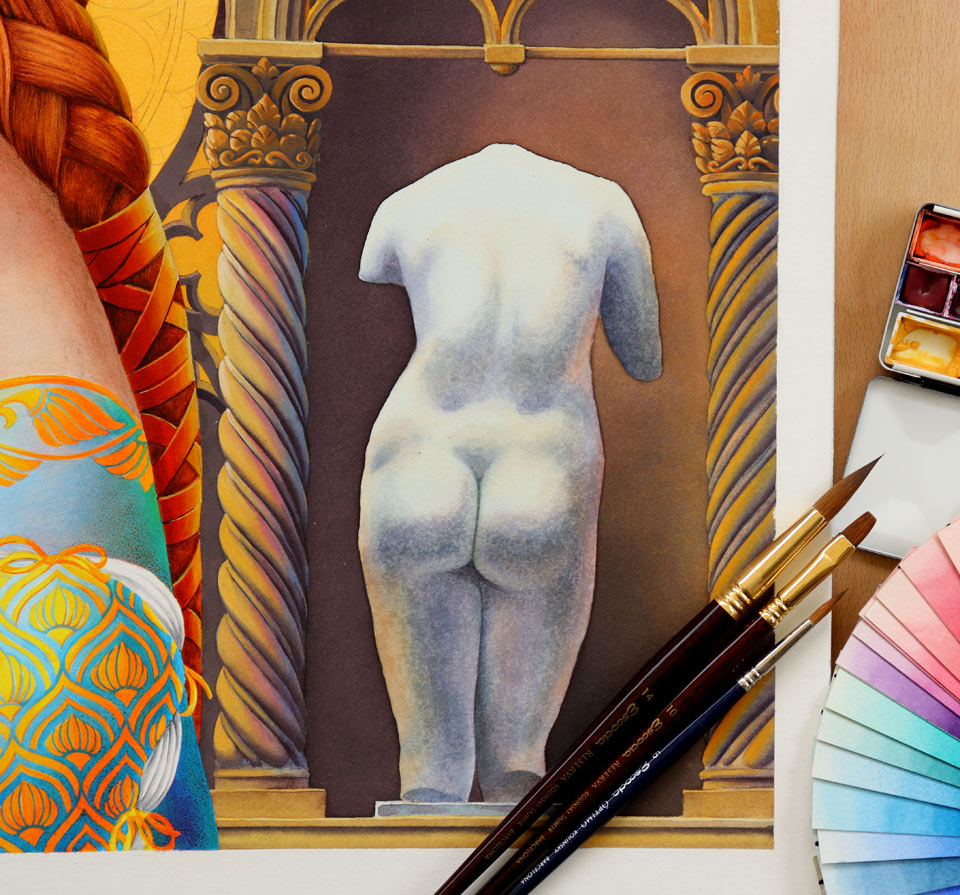
I'm not sure if you can see that the texture of these windows is not exactly the same as the rest of the watercolor piece. Nevertheless, color-wise, it is almost what I wanted, so you may agree that we achieved the task of repainting the color instead of trashing this piece and starting a new one. Now, I will show you which yellow color I wanted for these windows. I will do it in watercolor, on white paper that was preserved by painting the first two washes around this circle. The board is tilted at about 15 degrees and the paint flows down because of this slope. To use gravity as a co-creator, I turn the board upside down and, as I go with the wash, I rotate the board, little by little, to continue this smooth layer of paint. You may see that the yellow color on white paper looks different from the yellow windows. I might do a few more washes to deepen this yellow circle. It's time to paint the marble sculptures. Actually, it's the same Venus sculpture depicted from two sides.
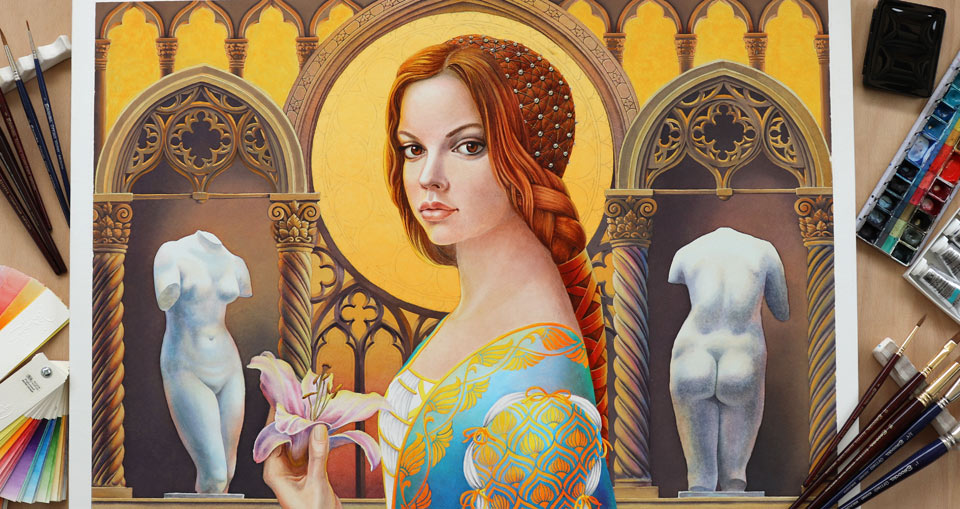
I did preliminary sketches of this ancient marble Venus in Museo del Prado in Madrid, Spain. It's a wonderful sculpture that I wanted to include somewhere in my art. You may see that, from this view, it's framed by the arched doorway. This gave me inspiration for this piece's composition. I applied clean water on the paper first and now will be painting the figure, wet-into-wet. The marble sculpture is white. I often get questions from students who ask what colors they should use to paint white objects. It really depends on the color of light and colors of other objects that surround the white one. I will use just three primary colors - blue, yellow, and red - to paint this white sculpture. Yellow, warm light comes through the window and colors the light areas of the sculpture in a warm tint. The shadows are cold and, therefore, I painted them in blue; and the parts of the sculpture lit by the reflected light are warm and dark, so I will add red color into these areas. Of course, it doesn't mean that you have to use three primary colors, blue, yellow, and red, every time you paint some white object. The color could be anything you like. You could even do a monochrome painting using just one neutral color for that purpose. However, adding other colors, would make this sculpture more lifelike, so the choice is yours.
You can see some random spots on the body of the sculpture, which I actually didn't anticipate. These defects can happen when the paper is over soaked in water and its glue is washed out. But that is not what happened in this case, so it might be something else that spoiled this high quality, 100% cotton watercolor paper. Nevertheless, I will continue to the main portrait and see what will happen with the paper, and how it will take the watercolor paint. You may take good care of your paper, but you don't know what happened to it before you bought it. For example, it might have been on the art shop's shelves for many months, collecting dust and fingerprints of other people. So, this might be just one of those cases. I do not remember if I bought it in a sealed plastic bag or as a loose sheet. You may notice that the paint on the nose becomes spotty as well. So, I will use it as an excuse to show you another way to fix a mistake and turn a watercolor painting into a mixed media artwork. To do so, I'll use gesso once again. I believe it is a fast-drying acrylic gesso that is available at any art shop that sells oil paints and canvases. I go with this gesso over the whole portrait and will let it dry thoroughly before continuing to paint.
The next medium I would like to use is egg tempera. I will do an underpainting in a light brown color. Like watercolor, tempera is also diluted with water; but what makes it different is that, when it dries, it becomes water resistant. So, I will not be painting this artwork in watercolor anymore, but will continue in egg tempera and finish it in oils. Yes, you heard it right. I will complete this piece in oil paints. I might also use acrylic, just for the sake of making this painting truly mixed media.
I will paint the flesh and hair in monochrome brown color. This preparatory layer is called underpainting. Some of the Old Masters used egg tempera for this purpose. So, this painting technique has many hundreds of years of history. With the tempera underpainting in place, I will now paint on top of this layer with oil paints. How to paint like the Old Masters using modern materials is fully explained in the Old Masters Academy online video course. If you would like to learn the secrets of traditional oil painting techniques, which are no longer taught at contemporary art colleges, you will greatly benefit from the Old Masters Academy course.
For the portrait, I'm using a walnut oil blending medium that is not prone to yellowing with time, as with, for example, linseed oil. There is one important thing you need to know about painting in oil on paper: Although it is made from 100% cotton like a canvas, it is not a good idea to paint in oils on the paper's surface without any preparation because the oil will penetrate the paper's fibers and make them brittle over time. The acrylic gesso priming, together with the layer of tempera underpainting, act as a physical barrier, preventing the oil from sinking into the paper. Because the paper is very flexible, it's better to apply oil paint layers very thinly. Thin layers will not crack when the paint is fully dry, even if you roll the sheet of paper into a tube. Also, thin oil paint layers are transparent. That is why the underpainting will show through and its light and dark tonal values will play an important role in the light and dark contrast in this artwork.
Now, I will use acrylic paint for the yellow design of the dress. There is no particular reason why I'm using acrylic in this piece, other than to show you that acrylic can also be used in a mixed media painting. Acrylic is a fast-drying paint, which can be mixed with water but not oil. So, do not mix oil paints with acrylic. These two mediums can be used in one piece but as separate layers. When an acrylic layer is thoroughly dry, you can paint over it with oils. You may want to wait for 24 hours to make sure the acrylic is totally dry before applying oil paints on top. But it's not advisable to paint in acrylics over oils. This is because bonding between oils and acrylics is purely mechanical, not chemical. Thus, the acrylic paint will not adhere properly to the oil paint and will flake off sooner or later. Now, I will continue the dress in oil. To do so, I will use walnut oil as a medium and blue paint, which I don't want to turn greenish over time as it would if I were to use linseed oil instead of walnut. I will also use titanium white oil paint to make light blue tints. You may notice that I premixed a range of tints on the palette to use for the dress. I will carefully fill in the white areas with blue paint which gives me brighter colors and greater hue contrast between the yellow and blue, compared to the faster way of making this dress by first painting it with blue all over and then applying yellow on top.
I will show you how to do glazing in oil painting. For this, I'll need oil paint and the sun-thickened walnut oil. This medium is made by exposing walnut oil to sunlight for several months. After this treatment, its viscosity increases greatly. I apply the very transparent paint mixed with thickened oil over the fully dry underlayers and spread it very thinly with my finger. This glazing layer is very transparent; you can easily see the dress' design through it. What this glazing does is optically mix the colors of the top and bottom layers, uniting them together and adding warm, reflected light to this cool dress.
A self-study, self-paced course where you can learn how to paint in watercolor by watching video lessons and doing assignments
One-time payment - Lifetime membership
$297 USD
One-to-one, unlimited and custom-tailored to your skills and needs Personal Tutoring by the Watercolor Academy teachers
One-time payment - Lifetime membership
$997 USD


