Watercolor Academy Online Course
A self-study, self-paced course where you can learn how to paint in watercolor by watching video lessons and doing assignments
$297 USD
ENROLL NOWA self-study, self-paced course where you can learn how to paint in watercolor by watching video lessons and doing assignments
$297 USD
ENROLL NOWOne-to-one, unlimited and custom-tailored to your skills and needs Personal Tutoring by the Watercolor Academy teachers
$997 USD
ENROLL NOWVideo lesson by Vladimir London
In this watercolor video lesson, you will discover how to paint in watercolor using the 'wet-on-dry glazing' technique.
To explain and illustrate different watercolor painting techniques, I will use a very simple object – an apple.
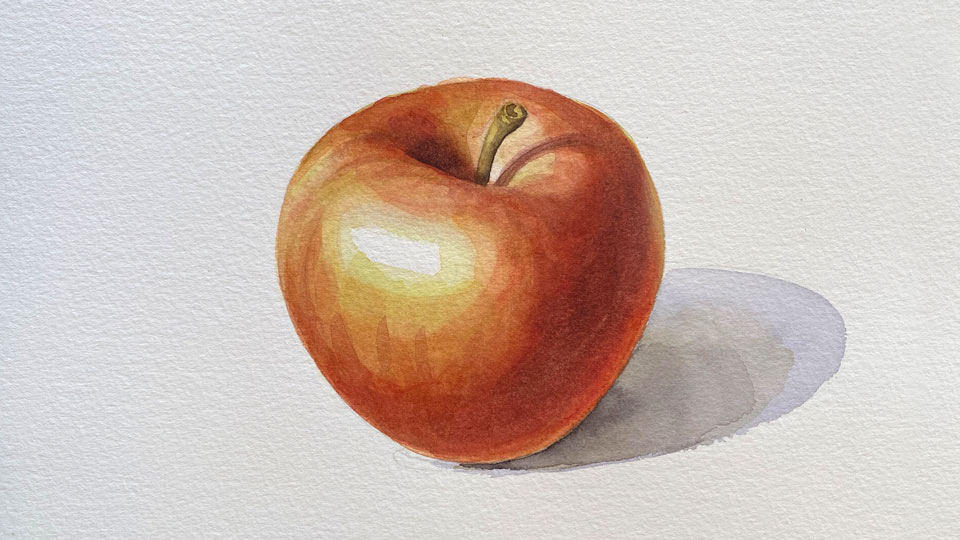
First, I will make a quick sketch on the watercolor paper sheet in graphite pencil. The subject of the painting – an apple – is not important; you can depict whatever you want. For example, it could be any fruit or a vegetable, or a manmade non-organic object. The painting techniques that I am about to show you are universal – you can use them to paint whatever you see or imagine.
The painting technique that I am about to demonstrate is called 'wet-on-dry glazing'. As described by its name, the wet paint will be applied onto the dry paper surface. The word 'glazing' means a very transparent layer of paint. Therefore, I will paint an apple in multiple transparent watercolor layers, applying them on top of each other on the dry surface. This means that every glazing layer has to be totally dry before adding another one. You can see that I have made the very first layer in a light-yellow tint, leaving the apple highlight unpainted. I will now add another layer of yellow paint, a tiny bit darker and more saturated than the previous one, but still very transparent.
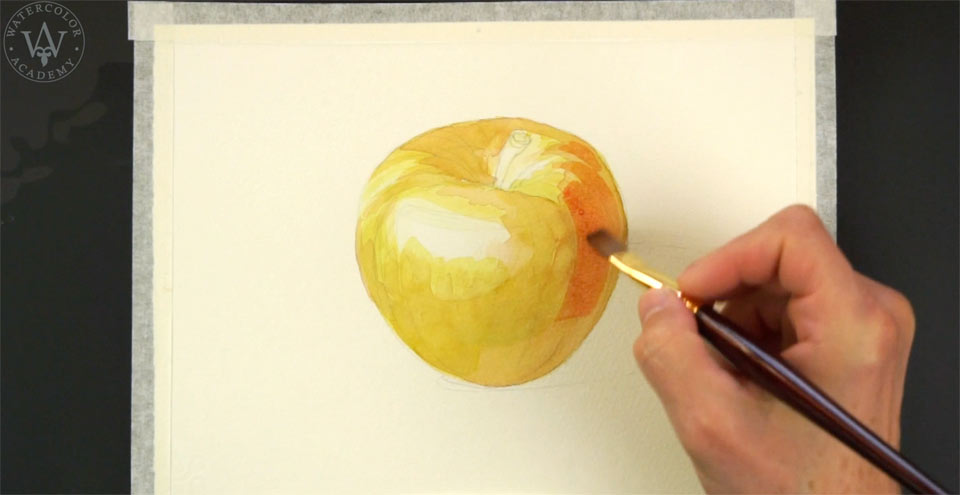
I am painting with a natural hair flat brush from Escoda. It is a great tool for applying very thin layers of paint, because it takes less water than a rounded brush would. A paint layer with less water will dry faster, which is what we need in order to speed up the painting process. I can also use a hairdryer instead of waiting for the paint to dry by itself.
One of the main rules of watercolor painting is that it should progress from light to dark tones. That is why I started with the lightest colors of this apple, which are yellow. Because every glazing layer is transparent, the colors of each layer will play their roles in the overall artwork appearance. Such an affect is called 'optical mixing'.
The optical mixing is very different from mechanical mixing. Mechanical mixing is when different color pigments are intermixed together on the palette, or directly on paper. But optical mixing is when those colors are painted separately layer by layer, and the colors of the underlayers are showing through, contributing to the overall appearance of an artwork. The end result of optical mixing will look different to the result obtained by the mechanical mixing of paints. You may see that, for every next layer, I am changing the color slightly, to build the hues and tonal values of an artwork gradually with each added layer. The previous layer had some green pigment, and now I am adding red into the yellow mix.
There are several rules which you need to know and follow in order to fully benefit from the 'wet-on-dry' watercolor painting technique. First of all, the paper surface has to be totally dry before applying the next layer of watercolor paint. The watercolor painting should proceed from lighter to darker tonal values. Because some paints are lighter by their nature, you may want to use them first. Watercolor paints that have very small pigment particles and dyes are better suited for the underlayers. The paints with heavier and larger pigment particles should be used for the top layers. If you ignore this sequence and start by applying paints with coarse and heavy pigments, after which you cover them with washes of dyes or finely-grinded small particle pigments, such an artwork may look dull and less saturated. Because the top layers may wash away the large pigment particles, which are sitting on the paper surface, with less grip and are therefore more easily removable.
Preferably, it is more suitable to apply the warm colors first and use cold colors for top layers. Such a rule comes from the physical fact that the wavelengths of cold colors are smaller, and will be muted by the larger wavelengths of warm colors. To put it another way, it is better to paint blue on top of a red painting layer than red on top of a blue layer. The tonal values and saturation of every next layer have to be a little bit higher than the previous one, which means that you have to apply a stronger color on top of lighter underlayers. If you paint light washes on top of dark colors, such an artwork may look dull.
In theory, there is no limit as to how many layers you apply, as long as the painted area remains transparent. In practice however, with every layer that you add, the tonal values of an artwork will become darker and there is a danger of losing the brilliance and saturation of colors. So, it is not about how many glazing layers you create, but about how you keep them brilliant and transparent. You should, under no circumstances, reach a point when the light can no longer penetrate through all of the glazing layers, and the white paper surface cannot show through. The beauty of the watercolor medium is that even the darkest layers must be transparent, in order for white paper to play its role in the colorful appearance of an artwork.
A self-study, self-paced course where you can learn how to paint in watercolor by watching video lessons and doing assignments
One-time payment - Lifetime membership
$297 USD
One-to-one, unlimited and custom-tailored to your skills and needs Personal Tutoring by the Watercolor Academy teachers
One-time payment - Lifetime membership
$997 USD


