Watercolor Academy Online Course
A self-study, self-paced course where you can learn how to paint in watercolor by watching video lessons and doing assignments
$297 USD
ENROLL NOWA self-study, self-paced course where you can learn how to paint in watercolor by watching video lessons and doing assignments
$297 USD
ENROLL NOWOne-to-one, unlimited and custom-tailored to your skills and needs Personal Tutoring by the Watercolor Academy teachers
$997 USD
ENROLL NOWBy Anna Ivanova
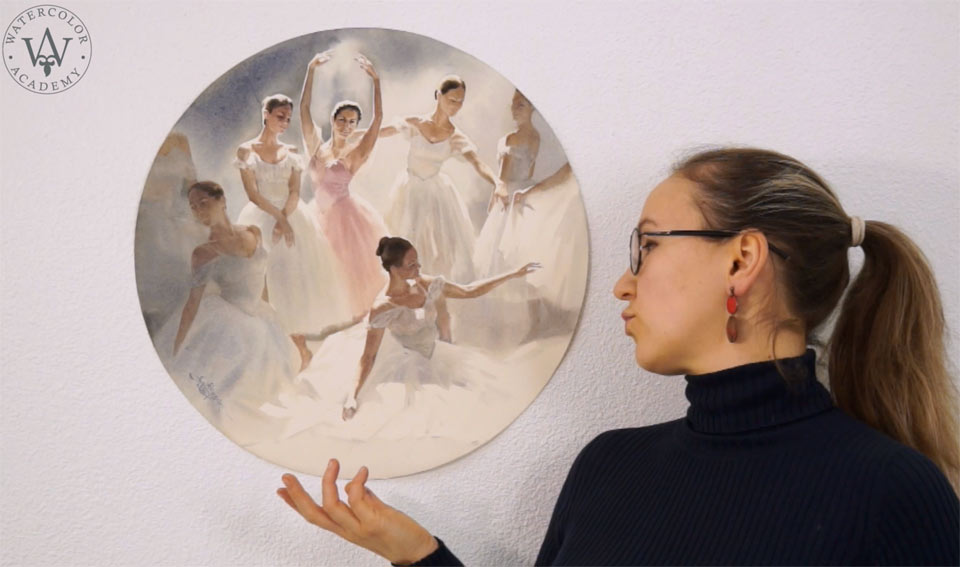
Today, I will be painting alla prima, wet-into-wet. The topic of this lesson is ballet. The composition features beautiful poses of the ballet dancers. The piece will be done on a round piece of paper and I will show you how to paint human figures on an airy background. Here is the watercolor I will have by the end of this video. There are many figures here, so there is a lot to be done in a short painting season.
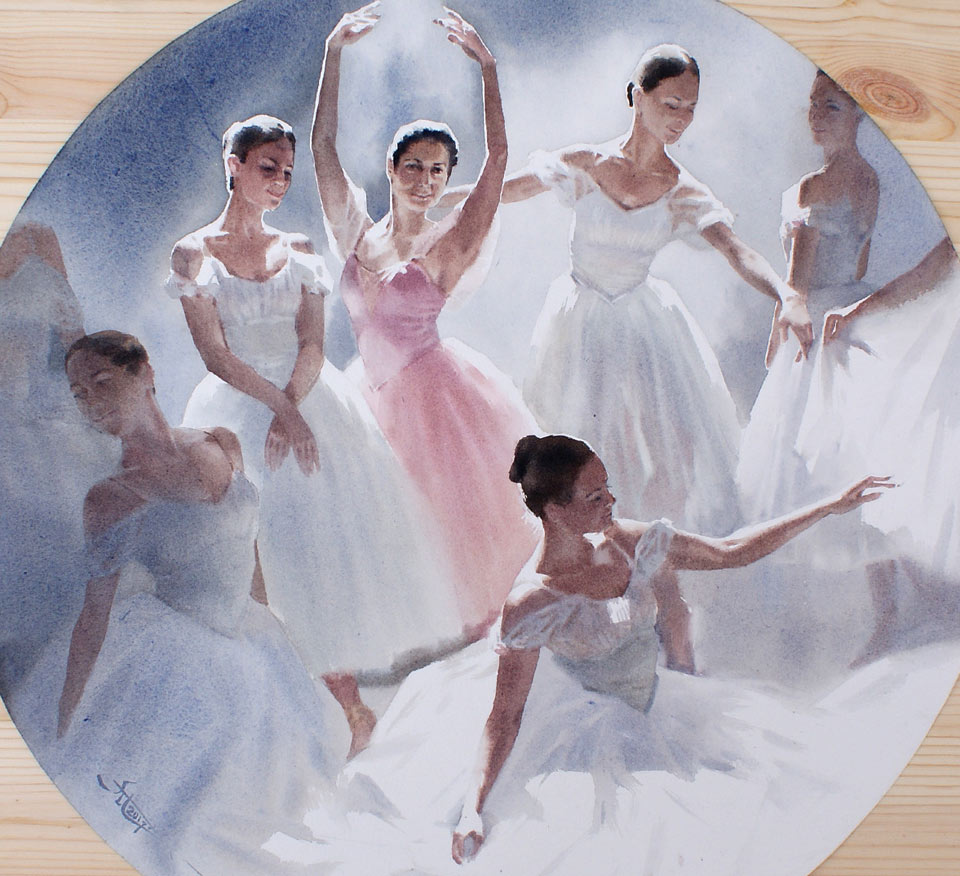
I already moistened the reverse side of the paper with water. Place it on the plastic board and now apply clean water with a soft, natural-hair brush on the front side of the what will be the painting. I will first paint the ballet dancers' figures and then will add a background around them. For the color of the faces, I'm using a mix of burnt umber, burnt sienna, alizarin crimson, and a bit of phthalo blue. This mix looks quite dark on white paper, but you have to remember that when the watercolor paint dries, it becomes about 20-30% lighter. Also, I need to account for the eventual background; the contrast between the light and dark tones of the figures and the background will not be as great as the contrast between the figure and the white paper. I will be using the wet-into-wet watercolor painting technique when depicting the dancers' dresses and adding the background. However, when painting alla prima, wet-into-wet is not fully suitable for very small and defined details like faces, hair, hands, and so on. That is why, for the areas where small details have to stay sharp, I will be using the dry-brush-on-moist painting technique.
You can see that I am painting small details with quite a sizable round brush. The belly of this brush is somewhere between damp and moist. To keep it semi-dry, I blot excess water from the brush with a paper towel. Also, the paint pigment is only put on the tip of the brush. It contains very little water and that's what makes it a "dry brush". In combination with moist paper, it's possible to paint such tiny details like the eyes, nose, and mouth. The dancer's face measures no more than one inch in this piece so it requires precision for the small details for the face to be recognizable. This is what the dry-brush-on-moist watercolor painting technique is good for: To make well-defined brush strokes which will stay as placed without diffusing and running down. On the other hand, the dry-brush-on-moist technique has its limitations. The main downside of this technique is that the artwork has to be painted in one session while the paper is moist. To keep the paper moist, I can add more water on its reverse side. So, a thin layer of water will be trapped between the sheet of paper and the plastic board. This will keep the paper wet from underneath but its front surface will be damp and cool to the touch. This type of surface accepts paint readily, almost sucking it from the brush.
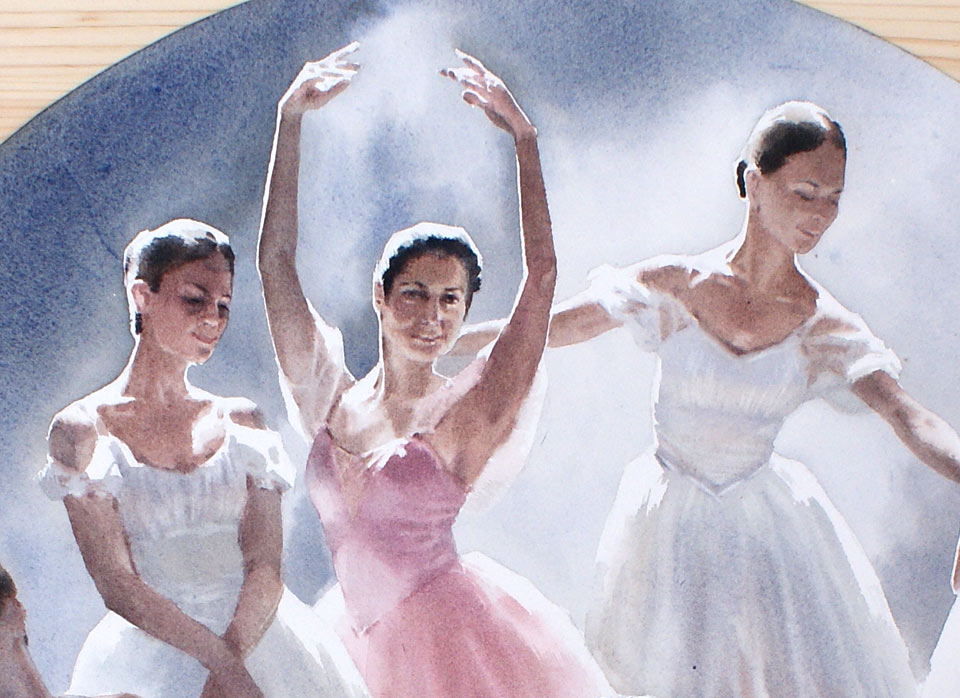
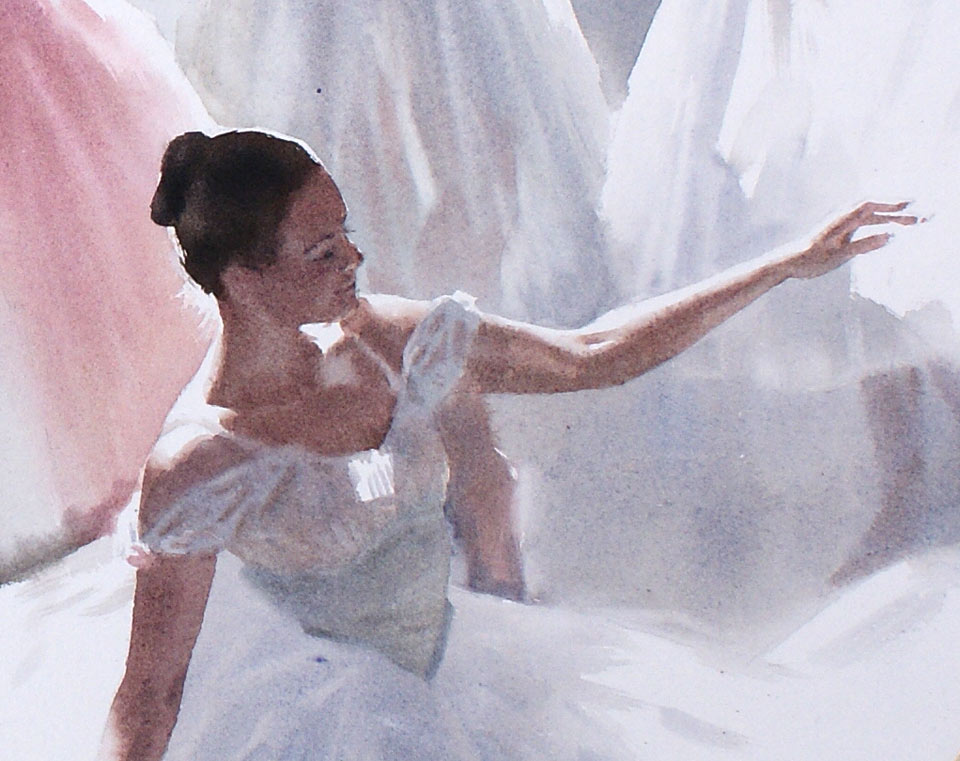
The paper might dry unevenly which is why I prefer to work on one area of the artwork to its full completion before continuing to paint other objects. The ballet dancer in the center of the artwork stays in a beautiful pose with her arms raised up. For depicting this type of pose, an artist must know human anatomy very well. For example, when a person lifts an arm upward, the position of the muscles change. The deltoid no longer goes down but points upward; the biceps change the deltoid's shape, pushing it up; the widest muscle of the back has a more prominent place in this view; and the pectoralis major also changes its shape and influences the shape of the deltoid.
In addition to being a full-time professional fine artist, I also hold a degree as a medical doctor. Needless to say, anatomy was not new for me. But imagine my surprise when I started painting watercolors and oils and I realized the knowledge I had of anatomy as a doctor helped very little when it comes to creating figurative artworks. So, I had to learn human anatomy for artists which is very different from anatomy for medical students. Anatomy for artists does not cover the deep layers of muscles, nerves, and other systems like blood circulation, the digestive tract, and so on. This information is not required for an artist. However, what is needed is the knowledge of the main bones and muscles that influence the body's appearance. It includes muscle shapes, functions, and points of origin and insertion. The good thing is anatomy for artists is much simpler than anatomy for doctors. As an artist, you don't have to learn difficult Latin names of bones and muscles. For example, as long as you know that one of the main muscles of the neck, sternocleidomastoid, originates from the collar bone and from the top of the breast bone, spirals around the neck and inserts into the base of the skull just behind the ear, you don't have to memorize its difficult name.
I have been painting for a while now and it's time to rewet the paper to keep it moist. I can do it by lifting the sheet from the plastic board on one side and applying water with a soft, natural-hair brush. If needed, I can do it for the other half as well. Also, applying water on the front side, soaks the paper even more from both sides. When applying water on the front side, you have to be careful not to touch the already-painted areas with the brush; this might dilute the paint and diffuse the brush strokes.
One of the main rules of watercolor painting is to work from light to darker tonal values. For example, I started painting this dress with its lighter tones. You may also notice that white highlights were preserved by painting around them. When the light underpainting for the dress is in place, I add darker brushstrokes depicting the folds and wrinkles of the fabric. Any object looks better in watercolor when it is painted with a cool and warm contrast. You may notice that the folds of the dress have warmer and cooler color tints. With two figures in place, I can now paint the third, sitting figure. I also start with its head, using slightly darker tonal values because when the paint dries it will appear lighter.
When painting portraits, even on a small scale, the knowledge of human anatomy plays an important role. The shape of a human head greatly depends on the bones under the skin. Understanding the skull anatomy helps to understand its main planes and proportions.
If you feel that you have gaps in your knowledge of human anatomy for artists, you can fix it by taking an Anatomy Master Class, the online course for fine artists where you can learn all you need to know about the main bones and muscles, as well as proportions of a human body. The information in this course is presented in 25 video lessons that you can watch one-by-one, and covers everything you need to know in a fast and easy way.
If you already have a good understanding of human anatomy for artists and would like to learn more advanced topics of how to draw portraits and figures from life, memory, and imagination, then Life Drawing Academy will be particularly useful for you. This online academy is suited for students who already have some basic drawing skills and would like to bring their figurative drawing to a higher level. There are two courses at Life Drawing Academy. The online course is a self-taught, self-paced video course you can take in the comfort of your home and watch 52 video lessons on portrait and figure drawing. The Life Drawing Academy online course comes with a lifetime membership; there are no deadlines, no time limits. As a student of this course, you can also rely on unlimited personal support from the academy's tutors. This support includes critiques of your artwork and answers to your art-related questions.
I'm now painting a white dress. When it comes to depicting white objects on white paper, many art students have the same question: What paints should I use for white colors? For this dress, I'm mixing the following pigments: raw sienna, phthalo blue, sepia, and blue ultramarine. They produce nice-looking tints of light gray.
As we are talking about colors, I will also mention what pigments I used for the skin. Light tones of the skin are mixed from raw sienna, phthalo blue, alizarin crimson, and burnt umber. For the mid-tones of the skin, I also add sepia into that mix. And finally, for the cooler and darker skin shadows, I add a little bit of blue ultramarine to the pigments mentioned above which deepens the tone and lowers the temperature of the shadow color.
When using the dry-brush-on-moist watercolor painting technique, you have to keep in mind that the paint will remain wet on the paper surface for quite a long time. Some mixes of pigments might separate directly on the paper after 20 or more minutes of staying wet. This might give a granulation effect. This usually happens when a mix contains heavy particles of pigments that will behave differently from dyes or finely-ground lightweight pigments.
I mentioned that Life Drawing Academy has two courses and described what you can expect from the self-learning online course. There is also another premium option available for you at this academy. It is the Life Drawing Academy Correspondence Course. This course is truly unique. This is probably the best solution you can find today on the internet. The Life Drawing Academy Correspondence Course is one-to-one tutoring you receive from talented and professional artists and art teachers. In this course, you will learn to draw whatever you see or imagine, including portraits and figures. This course is unique because it is designed for you, depending on your current level of skills and experience. The course curriculum is prepared individually for every single student. Academy tutors assess student's current drawing skills and provide full feedback on them. The student's personal goals are also taken into consideration when creating the curriculum for him or her. This curriculum includes up to 100 drawing tasks that are explained in every detail and which are demonstrated by the academy tutors. A student has to do each drawing task, one by one, and every task once again, to be assessed by the academy tutors. This way, a correspondence course student knows exactly what to do and how to improve their drawing skills. This personal tutoring is available for a one-time fee and is provided for as long as is needed by a student, until he or she achieves personal creative goals and raises the drawing skills to an advanced level. All communication between students and tutors is done by correspondence, via email. And because the academy's tutors come from leading Russian art academies, there is no other place where you'd get the same quality art education without relocating for several years to Moscow or St. Petersburg and entering one of the top art academies of the world.
Being from Russia, I know this from my own experience. I started my art education at a very early age, entering the art school for children in my city. To become a professional artist, a student in Russia must go through an extensive education to prepare for the entry exams for the leading art academies. This would include four to five years at the children's art school, followed by three to four years of preparatory art courses, and finally, five more years at an art academy. The competition to enter these academies is huge. So, the Life Drawing Academy Correspondence Course is your unique chance to learn from fine artists and teachers who went through the whole system of Russian art education themselves.
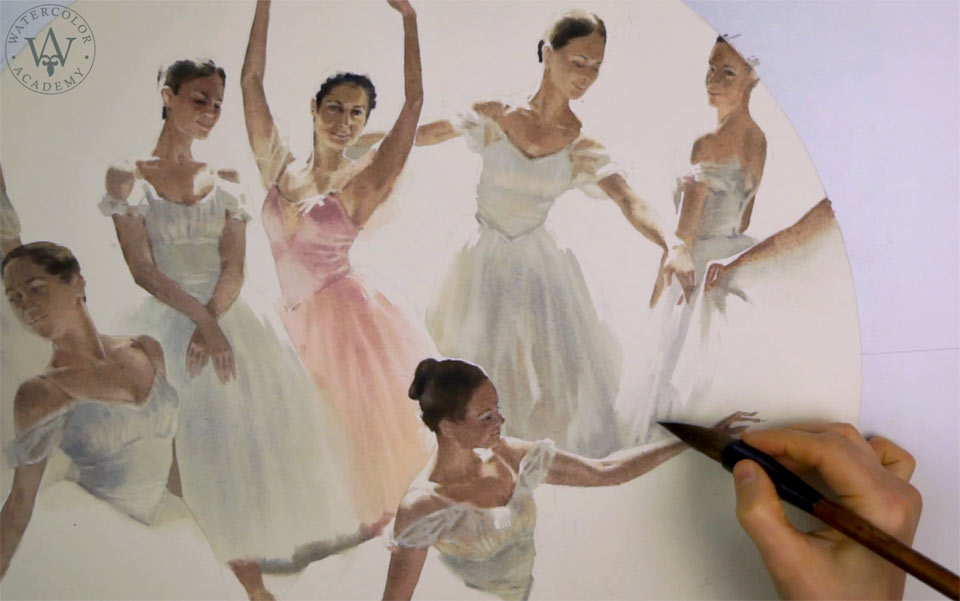
With all the dancer figures complete, it is time to take care of the background. The color for this background is mixed from two pigments: sepia and ultramarine. These colors are on the opposite sides of the color wheel; a warm and a cool one. When mixed together, they produce a nice-looking, dark neutral gray. I apply this mix with a wide, flat brush, making sure I do not overlap with the figures.
You may notice I'm leaving a very thin gap between the background and the outline of the figures. Then, I work along this gap with a smaller, round brush, filling the gap with the necessary precision. Big areas of the background are painted with a flat brush, wet-into-wet, and narrow gaps are filled in using the dry-brush-on-moist watercolor painting technique.
The dancers' figures on the left-hand side are overpainted with the background shade. This puts them in shadow which helps attract the viewer's attention to the figures in the center. Also, because the figure on the left-hand side is cut off by the round paper shape, composition-wise, it makes sense not to attract too much attention to this figure.
You may also see that I vary tonal values of the background to achieve an illusion of an aerial perspective by making some places of the background darker and others lighter. This gives an airy depth to this piece and all figures appear in an environment instead of a plain gray wall. For this reason, I would like to keep the background very light on the right-hand side, as if this side of the stage is lit by bright light. To unite the ballet dancers' figures with the background, in some places, I go over the figures with a light tint of the background. Also, I paint over the figure on the right-hand side to place it in the shadow. There are a few more places left which I have to paint before finishing this piece. Although the white dress of the sitting figure is the closest object to a viewer, and according to the rules of aerial perspective must be depicted with sharp contrast with full details, I would like to keep it secondary, as well as the dress of the kneeling figure on the left-hand side. This way, I will keep the attention of the viewer on the figures in the center rather than on the fabric and folds of the dresses...
A self-study, self-paced course where you can learn how to paint in watercolor by watching video lessons and doing assignments
One-time payment - Lifetime membership
$297 USD
One-to-one, unlimited and custom-tailored to your skills and needs Personal Tutoring by the Watercolor Academy teachers
One-time payment - Lifetime membership
$997 USD


